Friday, November 30, 2012

App Review: AppsFire

There are a lot of apps out there that are designed to help you get more apps. One that I really find to be useful is Appsfire. It keeps you up to date on deals for popular apps. Navigation is pretty easy. The apps are sorted out by category. Examples of some of the categories include music, navigation, social networking, photo and video, news, staff highlights, best deals of the day, and more. So many more. Searching through the categories is very user-friendly. You can swipe left and right to see more apps in each category. It shows you the regular price and sale price. If you want to purchase the app, simply select it and you'll be sent to the app store to complete the transaction. 

But here's the best part about Appsfire. Is there an app that you really want to try out but don't want to spend the money on? Let Appsfire keep an eye on it and let you know when the price drops. Here's how easy it is. Search for the desired app inside Appsfire. When you find it, save the app to your wish list. Appsfire will send you a notification when the price of your apps is reduced. 

The best example of how I've used Appsfire is with the app Splashtop2. It's a popular app that teachers want, but the price is all over the place. It's typically $6.99, but drops to $.99 every now and then. And when it does, you get 24 to 48 hours to get it purchased. So it's great to have Appsfire keep an eye on the price and let me know when it drops. 

This type of app is a dime a dozen. So give Appsfire a chance and you won't be disappointed. 

Friday, November 16, 2012

Create a digital course in iTunesU

I created my first iTunesU course this week. It's a course about how to use iTunesU Course Manager. I was amazed at how easy it was. If you are looking for a way to upload your digital content to a course that students can access on an iOS device, then you need to try out iTunesU. 

If you have an Apple ID, then you can get started immediately. On a personal level, anyone can create courses and enroll up to 50 students in each course. Your institution does not need to be enrolled for you to create your course. Just use your personal Apple ID or another one that you created just for this purpose. It might be helpful to create an Apple ID without using a credit card.

Now the first step for most teachers new to iTunesU is to download the Safari web browser. Yes, it can run on a PC. Once it's downloaded, open up Safari and visit the iTunesU Course Manager site. Log in with your Apple ID and you are ready to go. 

Setting up your site is a step-by-step process that I won't go into here. Instead, I'll pass along a helpful link to walk you through the process. This is Apple's iTunesU Support page for creating courses. Instead, I'll talk you through some of the features that I think are really simple and powerful for delivering your content. Here are my top-5 features in iTunesU.


  1. Linking to podcasts from iTunes - Course Manager makes it simple. Find the content in iTunes and right-click on the name. Copy the link and paste it to your materials page in your course. Done. One thing I learned in creating my course is that you can only link to specific podcasts, not the full subscription. But as a teacher, this is what I would want anyway. 
  2. Linking to other iTunes content - Teachers can send students to audio books, movies, shows, or apps. And the content can be free or paid. So you'll have to figure out a process for having students download paid materials. But it's so simple to point students to different resources to support learning. 
  3. Posts - The posts are the meat of the course. Teachers can create posts for any part of their course outline that contain text to inform or describe the next step. Along with the posts, you can add assignments. Link the assignments to materials that you've added like podcasts or eBooks. Students can check off their progress as they finish each assignment
  4. Adding your own content - Upload your already-made PDFs, Word Documents, videos, web links, Google Docs, or anything else. So you don't have to recreate what you already have. 
  5. Dynamic updating - I found this feature to be pretty handy. If you forget to add an assignment or post, just add it in. It will update automatically on everyone's device. But don't expect it to happen instantaneously. Mine took several minutes for the changes to appear. 
When you are ready to invite students to your course, iTunesU gives you an enrollment link. Simply email the link to your students or include it as a link on your class webpage. When students open the link, it sends the teacher a request to enroll. In your course manager page, you'll see the students who have requested enrollment and can approve admission from there. 

That's iTunesU in a nutshell. For students with iOS devices, it's great. I wish that you could access courses through any device using Safari. Hopefully that's coming up soon. But for me, it was easy to see how powerful iTunesU could be to organize a course and push your content to students. 

Good luck. 


Wednesday, November 14, 2012

What is Guided Access?

Do you only have one iPad to use in your classroom? Is it your personal device? Do you have students that you want to use an iPad, but are too concerned that their attention will wander to other areas of the device? Surely not. But if you answered yes to any of those questions, then you need to know about guided access. 

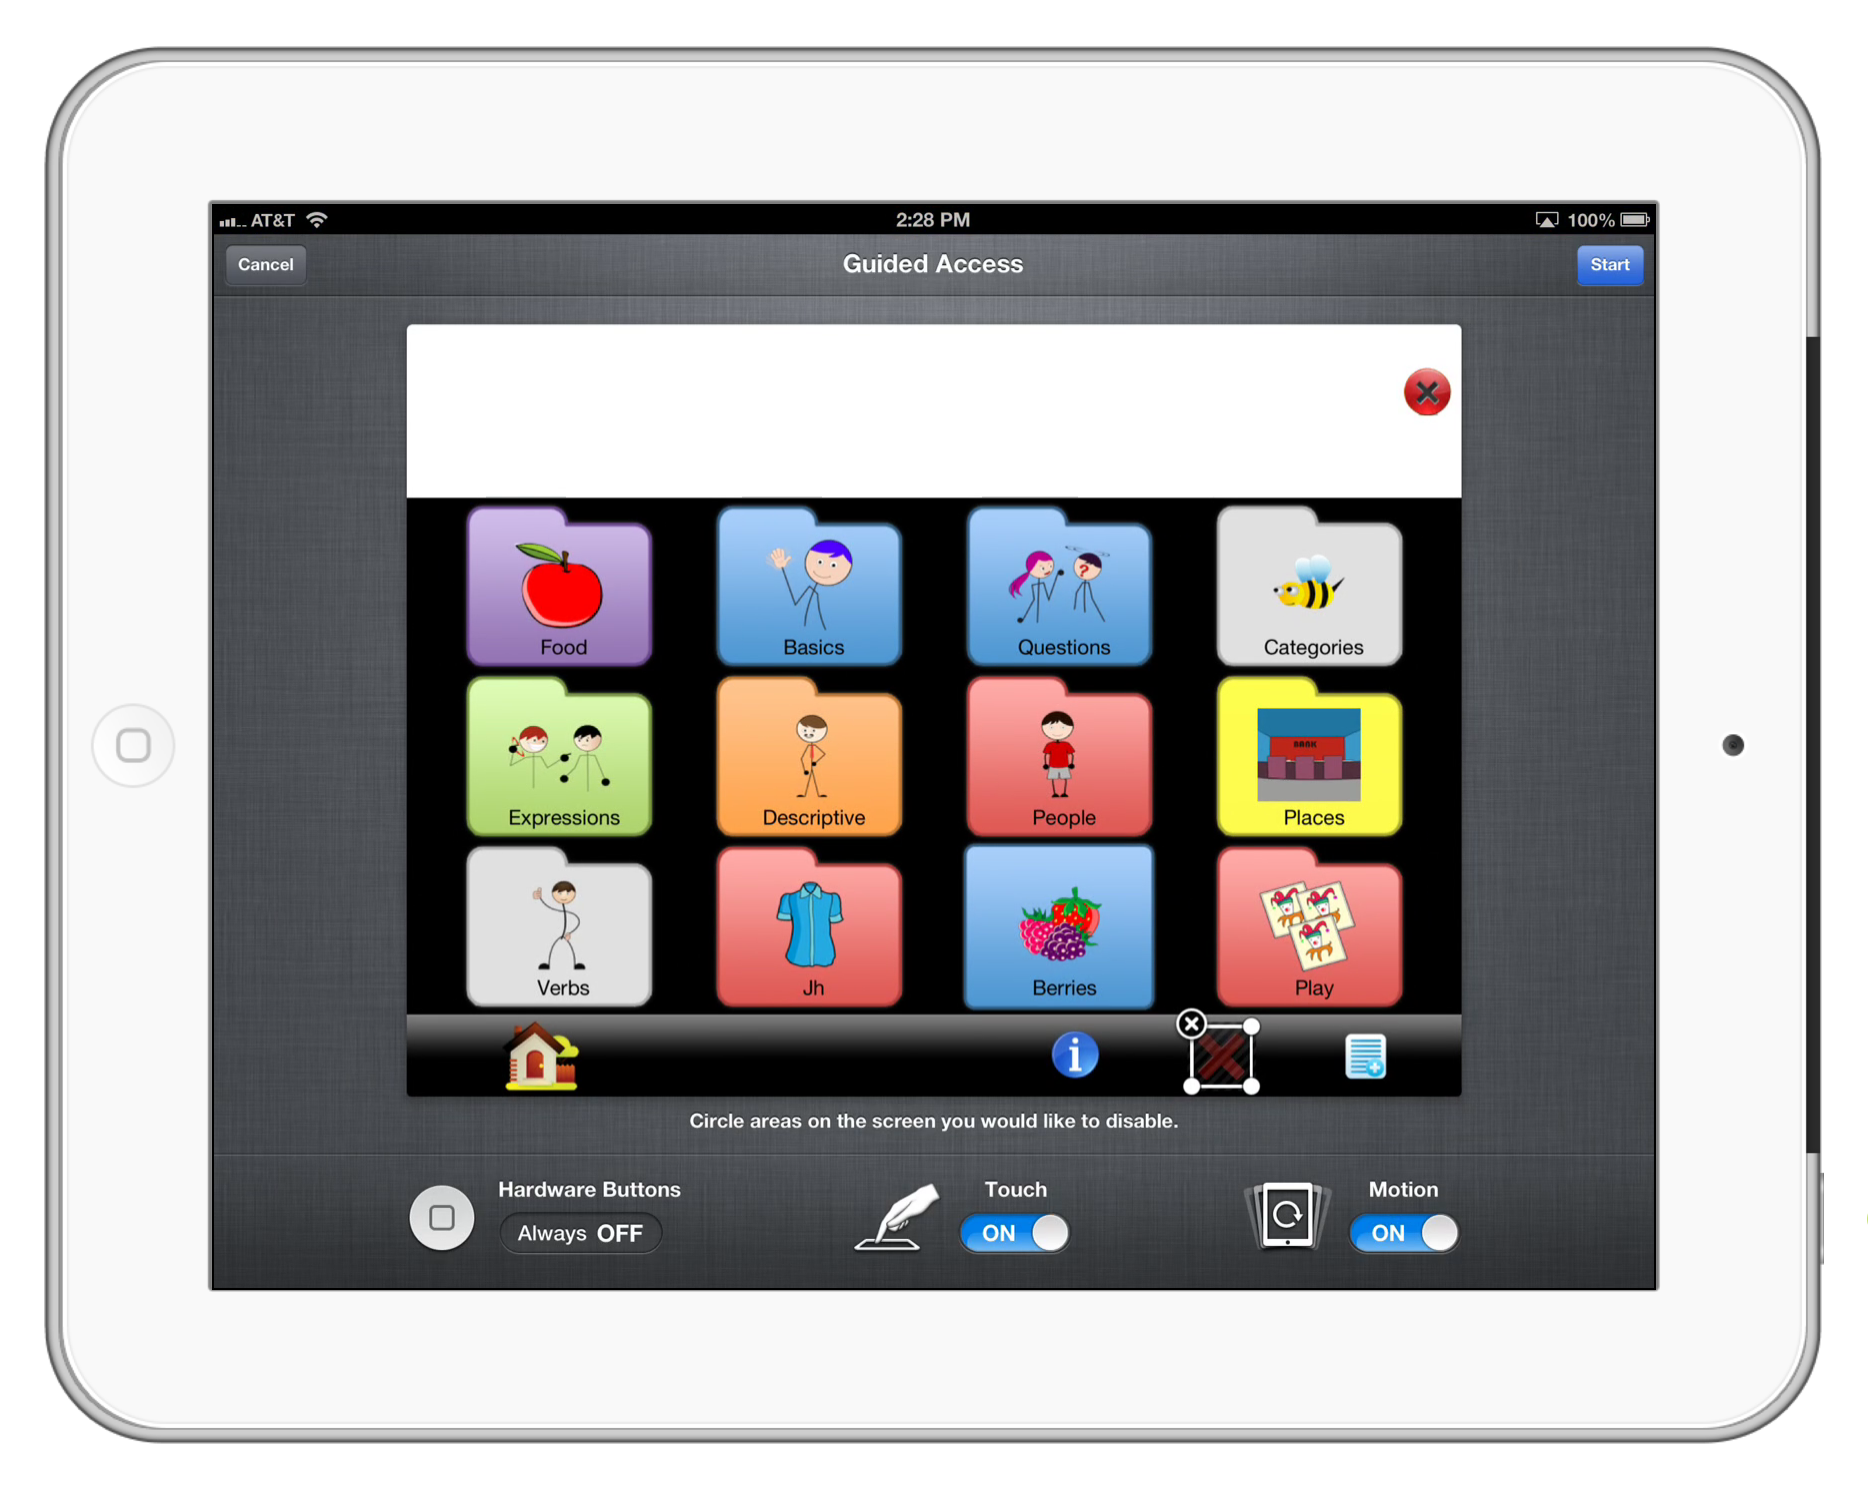
Guided access lets you control where a student can go on an iPad. You can lock the student into using only the app that you want him or her to use. Essentially, you choose the app, turn on guided access, and then hand it off to a student. The student will only be able to use that app until a passcode is entered. Here's how you set it up.


Go to your "settings" app. Go to the "general" tab and then scroll down to "accessibility". You'll find guided access under the learning category. Press it. This takes you to the guided access control area. Turn the switch to "on". This enables guided access for you. Next, press "set passcode". Enter a four-digit passcode (I would suggest the same one you use for the lock screen. No need to remember more combinations). Now you are ready to go. 

Launch an app you want your student to work with. Once it's open, triple-click the Home button to enable guided access. The screen will now show several options. You can disable all interactivity and lock rotation. You can also turn off access to particular regions of the screen. That way students can only interact with your predetermined areas. Then press "start". 

Now, no matter how hard he or she tries, the iPad won't let the student leave that app. If the home button is pressed, it lets the student know that guided access is on. Even pressing the power button does nothing. When the home button is triple-clicked, it prompts for the passcode. That's the only way out. 

Guided access is a great tool for teachers who want students to use the teacher iPad but don't want to give access to personal accounts such as email or social media. Its limitation to one app is good and bad. I would love to be able to limit to more than one app so some students could use multiple apps at the same time like iMovie and Safari to complete projects. Maybe that upgrade will come soon.

Friday, November 9, 2012

App Review: Educreations

Looking for a way to create mini-lessons? Want students to demonstrate their knowledge in a fun and interactive way? Then Educreations might be the app for you. Essentially, Educreations is an app for creating and sharing video lessons. 

At first glance, Educreations looks like any other whiteboard that you can find in the App Store. But upon further study, you'll see there is so much more to it. Admittedly, I had this app on my iPad for over a year before I started to dive in. For me, I was a bit turned off initially because you need an account to export your work. But what I originally thought was an obstacle is really the most powerful piece of the app. 

I would start on your computer to access the Educreations website to make a free account. Sign up as a teacher. Once you get your teacher account created, you have access to your dashboard. From here, you can create courses to house your content. Now's the time to get out the iPad. Open the Educreations app and get signed in. Choose "new lesson" and get ready to start.

Creating lessons is really easy. On your blank screen, you can choose from 10 colors to use with the pen tool. Pick a color and start writing. Or you can add a picture to the whiteboard so you can annotate, diagram, demonstrate a process, whatever you want. You can also add content from Dropbox, the web, or take a picture with the embedded camera. And there's more: you can add additional pages to your lesson. So walk students through step-by-step processes, tell a story, or compare/contrast topics. 


But wait. There's more. This is where the fun starts. You can record narration in real time. So have students solve a math problem while they are explaining their thinking. Highlight components of a cell as you explain their function. Or map the route of explorers as you talk about hardships they faced along the way. You have complete control over the slides so you can go back and forth as you narrate. When you are finished, save your lesson and choose your level of sharing. You can save it as a private lesson, with your students, your school, or public on the web. 

So you are probably wondering how students can access your lessons. Get back on the computer and your Educreations account. From your dashboard, visit the course you created. You should see an option to add an existing lesson. Choose that option and you will see the lessons you've created. Select the lesson and then add it. Now you have your first lesson in your course. Next step: add students.

Once you select your course, you should see a box marked "students". When you select it, you'll see options for adding students. You can choose either the URL that is supplied or the course code. If you send students the URL, they visit the site and then can enroll in your course. Once enrolled, they have access to all the lessons that you've uploaded. 

Educreations is easy to use, but a bit complicated to explain in writing. Hopefully, this post will spark some interest in seeing what this app can do for your instruction. As an elementary teacher, I would have loved the ability to have students use this app to demonstrate their learning. Like anything, play around a bit and you'll see how you can use. Start small and best of luck. 


Wednesday, November 7, 2012

Students and In-App Purchases

Don't make this mistake unless you want to run up your credit card bill. We had students in an elementary classroom rack up over $150 in In-App purchases on their teacher's iPad. After some playing around, we think we know what was happening.

By default, once you enter your Apple ID for a purchase you have 15 minutes to download as much content as you want without being prompted for your password again. Apparently the same things holds true for In-App purchases. I downloaded a free app from the App Store and then went to add some bux to support my Pocket Planes obsession. Sure enough, I was able to spend $.99 without entering my password a second time. The App Store assumes it's still you. 


So how do you stop this from occurring? Easy. You need to enable your restrictions through the Settings App. In "General", choose "Restrictions". Select "Enable Restrictions" on the top, then enter a four-digit password. Make sure you remember the number or write it down somewhere: Apple can't reset it for you. Then there are two things you can do. Both are under the "Allowed Content" section. 

  1. Turn off the "In-App Purchases". This would keep anyone, including you, from purchasing add-ons. Which is good if you are obsessed with Pocket Planes.
  2. Change the iTunes password requirement to "Immediately". This setting means that you can no longer enter your password one time and then download addition apps without it. Every time you download, even consecutively, it will ask for your password.
Doing one of the above will stop the problem. You'll need to figure out which, or both, would best best for you and your credit card. 

Friday, November 2, 2012

6.0.1 Update

There's already a new update for iPad. It's aptly called 6.0.1. It doesn't really do anything major and it took about 5 minutes to complete. Check in your Settings app to update. 

Mirroring your iPad with AirServer

Mirroring (displaying) your iPad through your projector is huge. If you are in the classroom, you want to be to have this seemingly simple tool for instruction. Surprisingly enough, it's taken such a long time to get viable solutions for this indispensable teacher tool. Software that I wrote about last spring called Reflection was a nice solution. Unfortunately, it worked really well on Macs but not so great on PCs. Now we have another nice option.

AirServer is our recommendation for mirroring with a PC. You can download a free 7-day trial through their site at airserverapp.com. If you are interested in purchasing, there is a very reasonable $15 charge for 5 licenses. Now while the price is right, the installation is a bit of a pain. I wrote up some directions for installing and running AirServer on your PC. Essentially, there are three things you need to install to get it to work (at least in our district): AirServer, DirectX, and Bonjour. Follow the link below for instructions.

Directions for Installing AirServer