Friday, December 19, 2014

Elementary Media Specialist: Kristen Burkemper


Apps I love:
Productivity: I use these apps on a daily basis.  I love that I can access my files on both my ipad and my computer.  
  • Google Drive
  • Notability
  • Evernote
  • Google Classroom

Classroom: These are all my go-to apps when I am working with classrooms on different projects.  Most of these apps are so versatile that you can use them across many grades and subjects.
  • iMovie
  • Front Row (math)
  • Popplet
  • Show Me
  • 30 Hands
  • Audio Boom - audio recordings
  • Heads Up - fun game for indoor recess, brain break, or vocabulary

Reading: I am always reading so I love my reading apps
  • Overdrive
  • Goodreads (check out Bookopolis for a kid verson of this - it is web based, not an app)
  • Flipster
  • Destiny Quest

I have been exploring a lot of coding activities recently so right now I really like both Kodable and Tynker. Hopscotch is also a great coding app, but I have not used it much yet.

Thursday, December 11, 2014

iBrainstorm vs Sticky

iBrainstorm
I wrote a little while ago about an app called Sticky. Since then I've seen it used in quite a few 1:1 iPad classrooms with success. There were some limitations to the app, most obvious of which is the limitation of creating two projects in the free version. Well, iBrainstorm is an app that has some features that Sticky doesn't. And the other way around. Here's a comparison of the two apps. 

Project Winner: iBrainstorm
Sticky only allows you to create two projects before you have to pay. You can delete and start over, but that's a pain. iBrainstorm allows you to create at least six (that's where I stopped). Much more versatile if you are using it extensively.

Multimedia Winner: Sticky
Sticky
I couldn't find a way to insert pictures in iBrainstorm. Of course, I could be missing something, but if it's not that obvious then it should be. Sticky allows you to quickly take or insert pictures from Photos. Sticky also allows for embedded web resources on your page. Very handy for research.

Project Flexibility: Sticky
Even though you can only make two projects in the free version, Sticky allows you to make multiple pages within your project (one student was on page 534 before her teacher stopped her). With iBrainstorm, you only get one page per project. Very limiting.

Aesthetic Winner: Sticky
iBrainstorm looks boring. Just a plain brown background. Yuck. Sticky lets you change the background of your pages. Great for organization by color. 

Writing Winner: iBrainstorm
You can add your own writing to iBrainstorm projects but not in Sticky. It's a nice feature if you'd like to interact with your sticky notes to draw comparisons, link ideas, or add your own comment.

Overall Winner: It Depends

I think both apps have nice features that the other should have as well. I'm quite surprised that the apps haven't applied those missing features to improve their apps. I would encourage your students to have them both on their iPads to use for different tasks. After all, they are both free. 

Monday, December 8, 2014

Shelli Thelen's Top 4 Apps


Shelli’s Top 4 for Fine Motor
  • Play 123:  Free. Use a stylus or your finger to trace shapes, make shapes, “balancing” shapes while making a stack, draw lines, etc.. One feature I like is that you don’t have to be able to read and it expects you to “stay on the line” in order to move forward. It is also fun to “spin” an object!
  • Pinch Peeps: Free. Really requires you to use the pincer grasp. And if you don’t bring your fingers together, you don’t get the points.  Play the timed version, it is fun!  Turn off the advertisements for this game.
  • ABC Tracer: Free Version. This app helps with letter and number formation.  Most letters are made the “cps” way. While it has an image and a word to anchor the letter, it does require you to go in ABC order. You must get A right before going to B. Can choose capital, lowercase, numbers or words.
  • Lego Instruct: Free. This app is like a step by step still image tutorial of how to make simple Lego things. Great resource during Center Time in the Lego Center.

Friday, December 5, 2014

Teaching good notifications manners

Everyone loves to feel wanted. That's one reason we want our phones and tablets to let us know when someone is connecting with us. It's only human nature. But at the same time, most teachers don't want their students' devices to pull them away from the learning activities in the classroom. It's only teacher nature. So what can we do? How about teaching students a simple way they can have all their notifications set up the way they want, but also a simple way to mute them during class? 

iPads and iPhones (and I would wager Android devices as well) have a simple feature called "Do Not Disturb". Since we have so many iPads here in CPS, I'll stick to that device. It's easy to set up and easier to turn on. Here's how you use it. 

Step 1: In your Settings app, you'll see the option for "Do Not Disturb". Tap on it. 


Step 2: There are several options to choose from within the Do Not Disturb screen. The one that's most important is the bottom option for "Silence". You want it set to "always" so the notifications will be silenced when students are on their home screens or within an app. Otherwise, it's only good for the lock screen. 
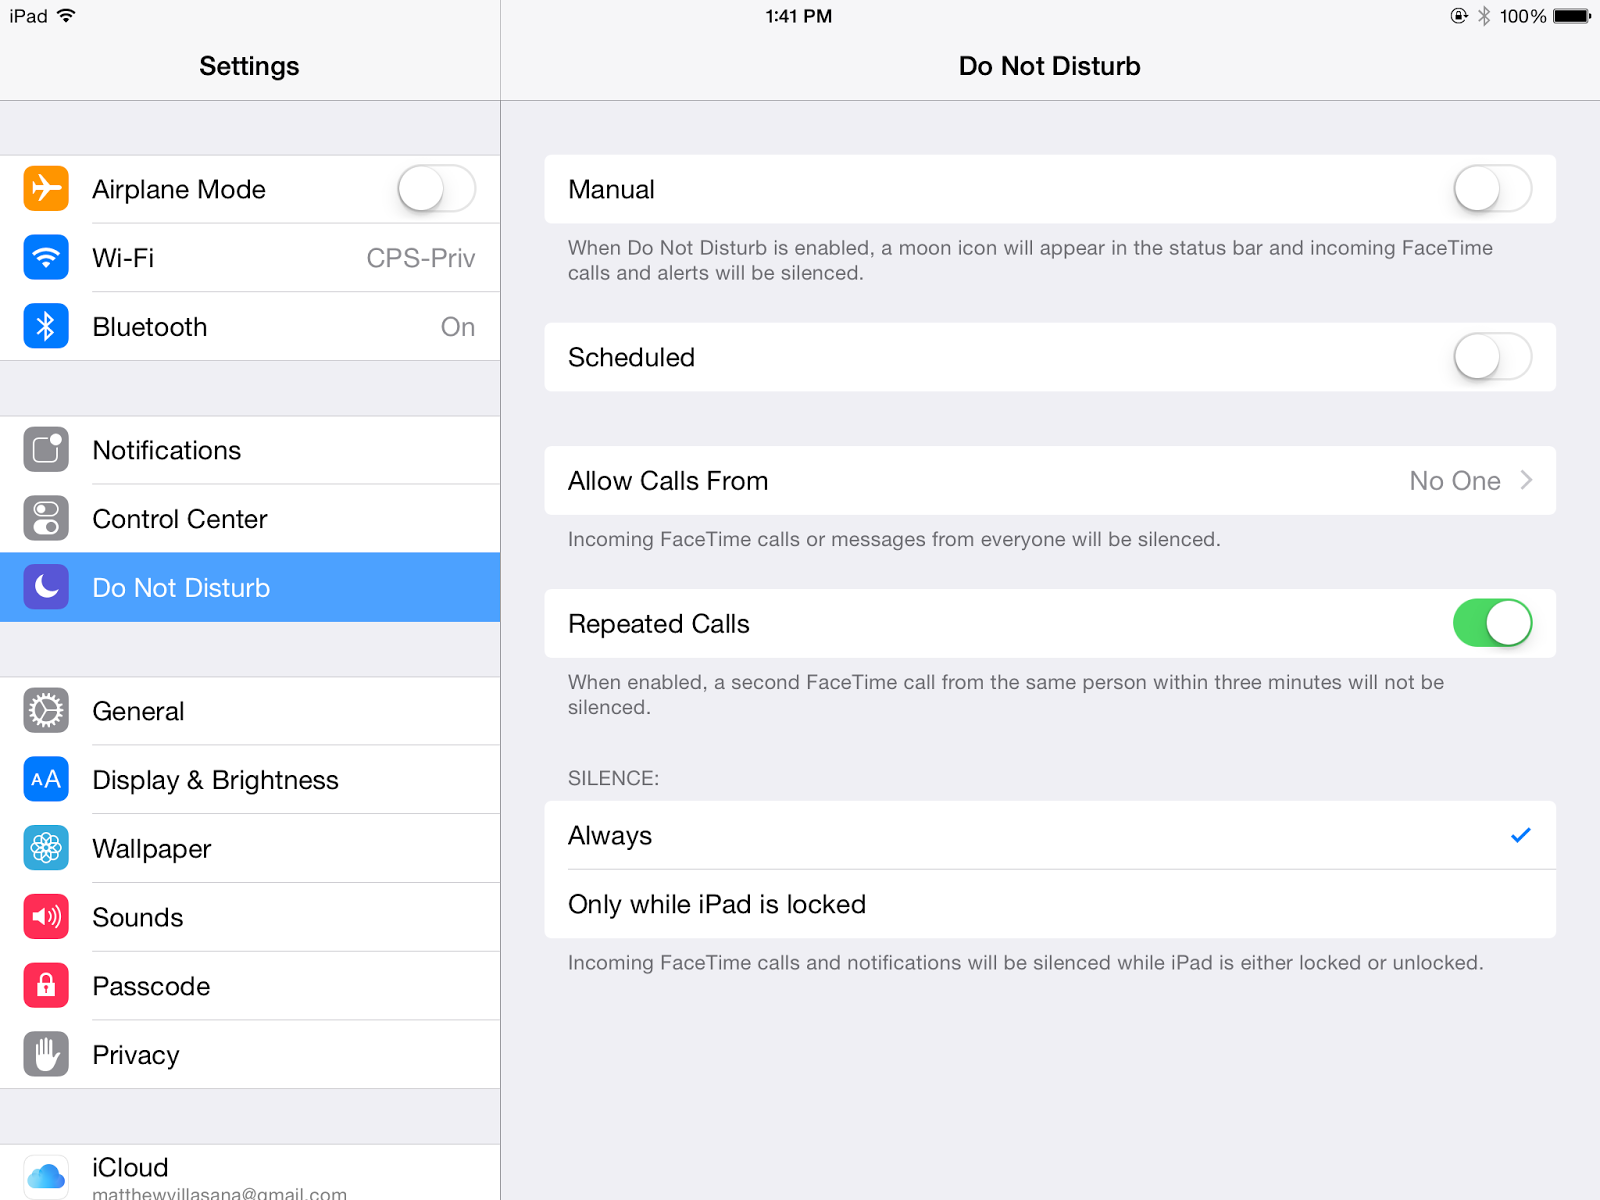
"Do Not Disturb" menu
You can also set up a scheduled "Do Not Disturb". For example, you could have students set it up during the school hours so it turns on automatically for them. 

Step 3: Make sure notifications are set for the apps you want. Usually when you open an app for the first time, you'll get asked if you want to turn on push notifications. However, if you're like me, you'll likely gloss over it to get started with the app. This is where you can make adjustments to receive the type of notification you want from the apps you want. 
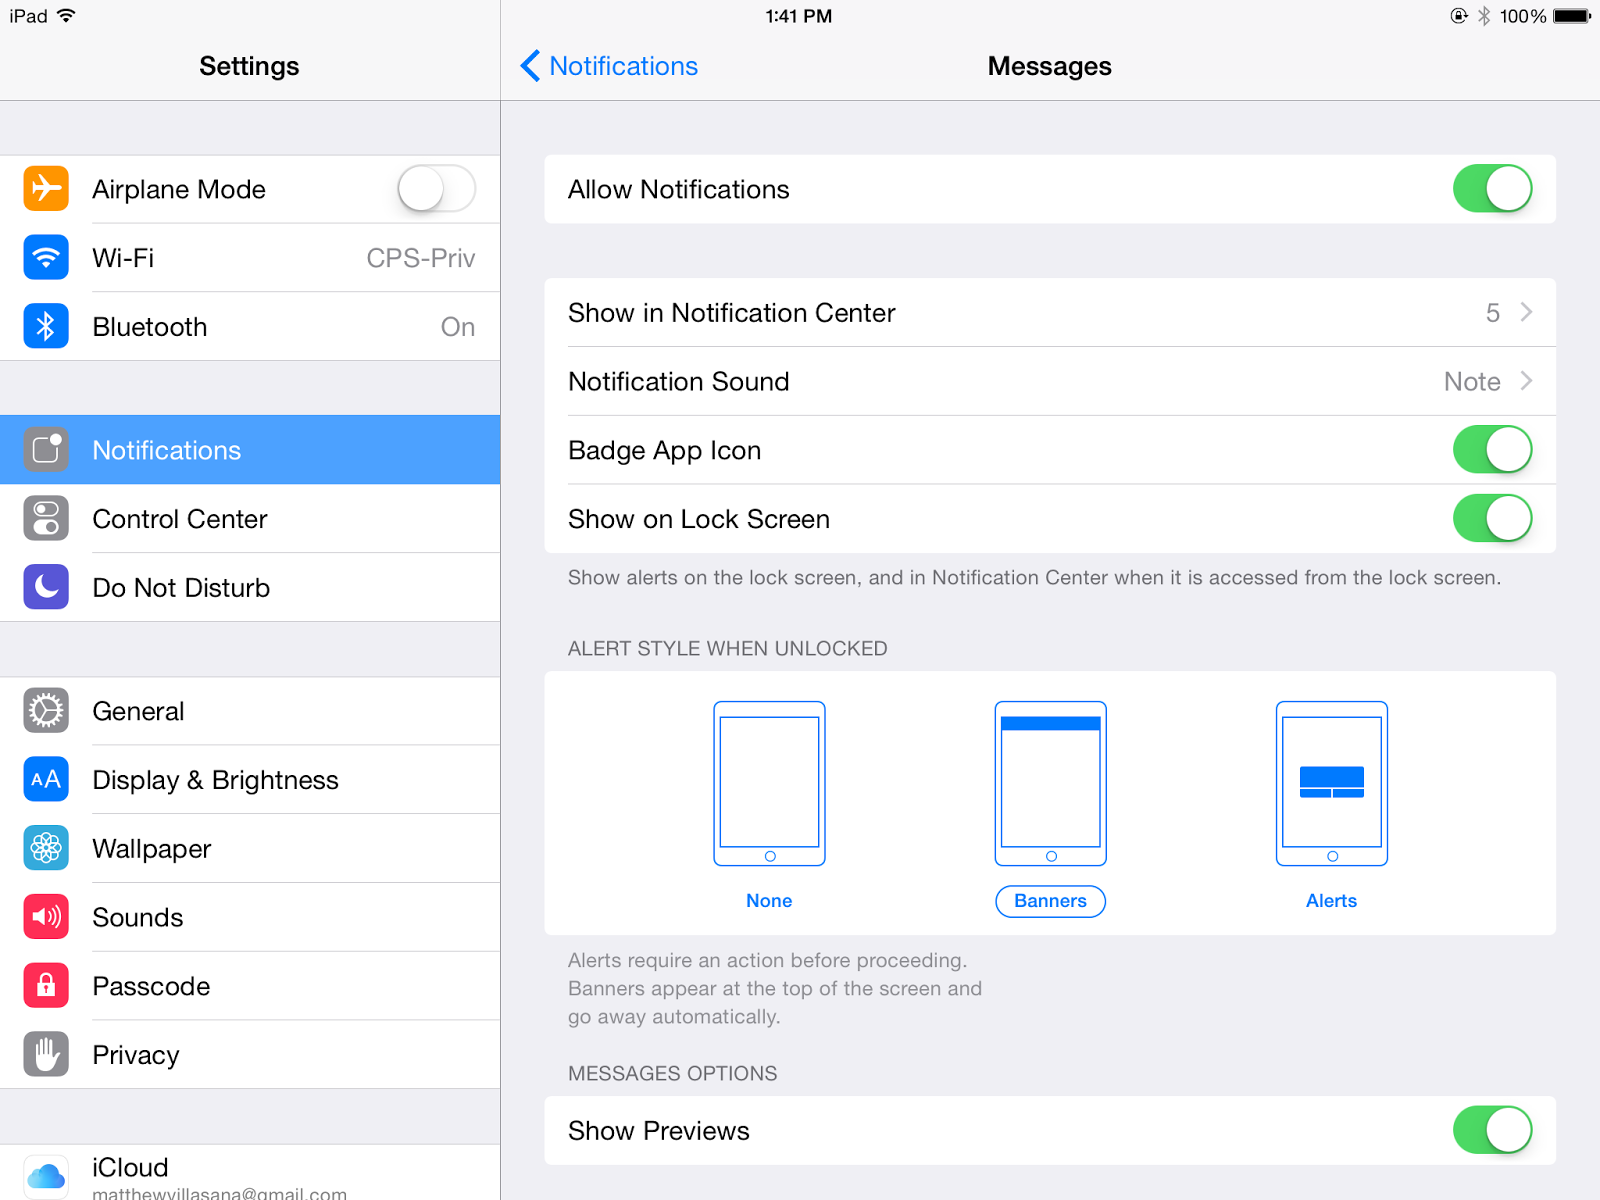
Set up your notifications
Just visit your "Notifications" area in "Settings". Go through your list of apps and set the options you want. You can choose to include badges (the little numbers in the red circles), show notifications on the lock screen, and select what type of notification you want (none, banner, or alert). You can also choose if you want a preview of the message which can be handy with email, messages, or perhaps news events. Of course, previews could be detrimental if you are displaying your iPad when you receive a private message...
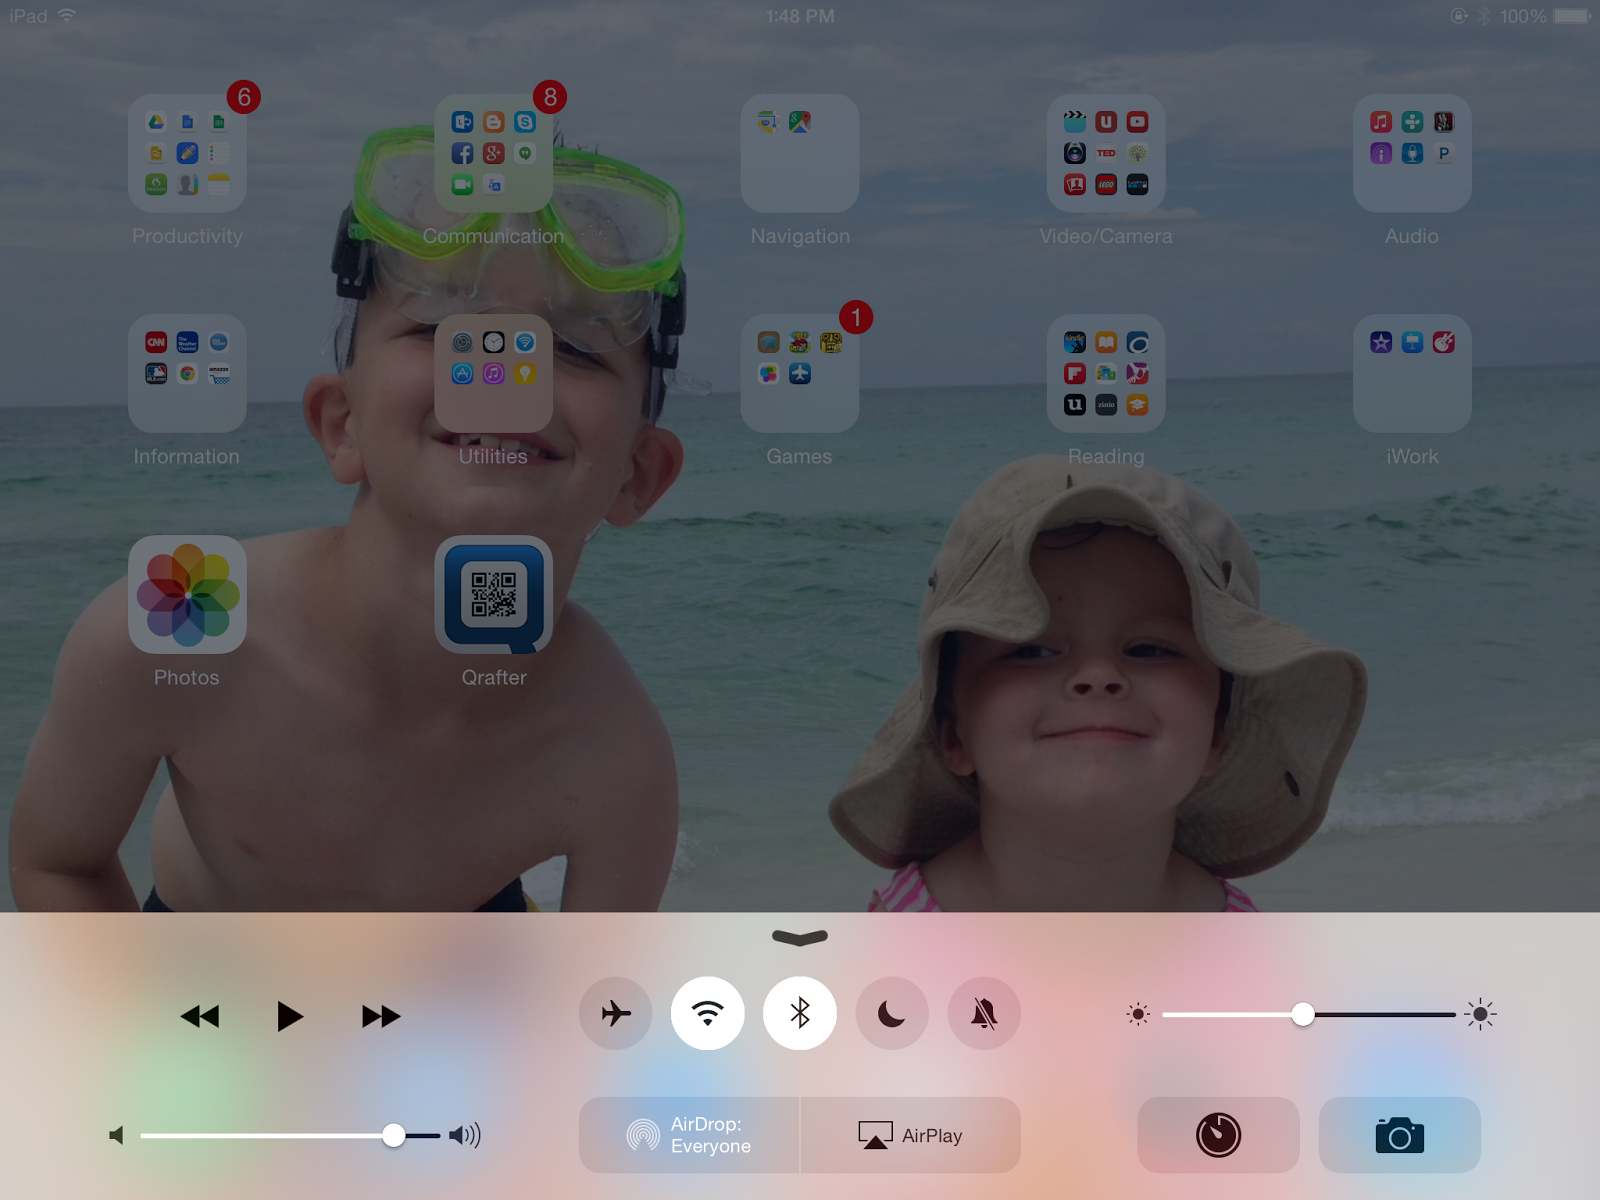

Reveal the control center
Step 4: The last step is to turn on "Do Not Disturb". From your home screen, swipe up from the bottom to reveal your control center. You'll see a button with a crescent moon that indicates your "Do Not Disturb" status. When on, the button is white. When off, it's grey. You'll also see the small crescent moon in the upper right corner of your iPad's screen when it's turned on.
That's about it. I think teaching skills such as these are an important part of your digital citizenship curriculum. Instead of telling students that they can't be notified, give them some tools to manage their notifications to create a win-win situation. 


Thursday, December 4, 2014

Sending Garageband songs to iMovie

One of the coolest iMovie features is the ability to easily import songs from iTunes to add flavor to your video. However, I have the hardest time figuring out the iTunes file structures, syncing content, etc. So when I was asked to see how to move a song from Garageband to iTunes, I wasn't excited about the task. But after doing a little playing around, I found a much simpler method. Try it out.

Step 1: Create your original song in Garageband. Then from your main projects screen in Garageband, choose "Select" in the upper right corner and then choose your song.


Step 2: Tap the "Share" button in the upper left corner. Whatever you do, don't send it to iTunes. Instead, choose "Open In..."


Step 3: Now you'll get options for sharing your song. Adjust the artist, composer, and album name to your liking. You can also change the quality settings. Then choose "Share".


Step 4: Choose to send the song to "iMovie"


Step 5: The iPad will launch iMovie. From here, you'll get to choose where you want to send your original song. Choose from an existing project or create a new one.


Step 6: The song will now be added to your project. From here, you can adjust the volume, choose to loop it or shorten it to fit the movie.

Now that Garageband is free, I would definitely have students create their own background music to fit your project. It promotes far greater creativity and also eliminates those pesky copyright issues that come up when you publish your video to YouTube. 

I know you have a ton of little composers in your room who will love to create their own music. Can't wait to see what they come up with!