In many of our 5th grade 1:1 iPad classrooms, teachers have allowed their students to create blogs to share their learning. It's really easy to get them started. Here's a guide for how you can get your students started using Blogger.
Set up your blogs
Self-explanatory, I know. Students log in to their Google Apps accounts and access Blogger. Check out the video below for some direction on how to get started.
Tips:
- When students sign in initially, have them "create a limited Blogger profile" with just their first name. No need for Google+.
- Determine a naming convention for the students such as "Matt's 5th Grade Blog". That will save a lot of time. The names can be changed later if necessary.
- Remember that you can pick whatever title you want, but the address has to be unique. Remove any spaces and punctuation and you might have to mess around a bit with the address to make it available.
- Don't mess with the templates at this time. Patience.
Adjust the settings for commentary
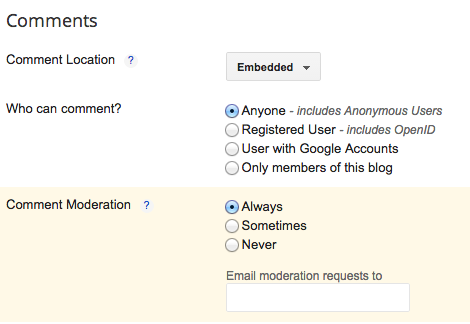
Blogs are great for the social interaction, but we want to make sure our students are protected. Blogger has many settings to allow safe, moderated commentary.
Tips:
- Always have comment moderation set to "Always". This means that nothing will appear published on the blog unless the author wants it on there.
- Consider having "who can comment" set to anyone. This setting would allow anyone who finds the blog the opportunity to comment. Often times relatives of students love adding comments, but may not have a Google account to use.
- Start with what's comfortable for the teachers, students, and parents.
Adjust the widths of the blog
Because most of our publication will come from the iPad, it's important that the blog be formatted properly. We've found that if you don't adjust the widths, pictures that are published from the iPad will overrun the posting area when in landscape mode.
Tips:
- Have the students go into the template area to customize it. Go to the "adjust widths" option and make the sidebar the minimum width.
- Play around with the widths and flip back and forth to the preview to make sure it's going to work.
- Publish a picture that is horizontally oriented from the iPad as a test. Then go back to make adjustments if necessary.

It's what everyone wants to do, so let the students show their personalities by customizing the background, colors, etc.
Tips:- Have the students put away the mouse and just watch as you walk them through some options. Be sure they understand they'll have time to work in a moment.
- I think it's best to only use the "simple" and "picture window" templates. Those are the easiest to figure out.
- Show them these areas: templates, backgrounds, and advanced. I like to show how to adjust the entire color scheme as well as individual pieces like the blog title and header backgrounds.
- This is a great time to discuss best practices. Making sure the title is large and legible. Use contrasting colors so pieces are clearly visible. Don't go crazy and make it distracting.
Once you have the student blogs created, make sure you find an easy way to share them. It's a good idea to create a separate spot on your classroom website or blog to add links to the student blogs. The students can find and create a shortcut to their blog on their school iPad and then AirDrop them to their peers to bookmark as well. And of course, utilize your classroom Twitter account to tweet new blog posts. A great hashtag to use to promote discussion is #comments4kids.
Have fun! Looking forward to seeing your students's posts.