Thursday, September 15, 2016

Incorporating QR codes in a "centers" activity

I got to spend some time in Mr. Harker's 6th grade social studies class last week (you can follow him at @smsharker). I could tell from the noise about 25 feet from the classroom that the students were really enjoying themselves!

Mr. Harker had a great activity set up for students to do self guided learning through a "centers" format. Students were learning about archaeology. There were several stations set up for students to rotate through. Once at a station, they scanned a QR code using their iPad to access content they needed to complete that activity. Check out the pictures below to see how it looked.

For the activity pictured below, students were challenged to analyze pictures on some Google Slides presentations. After their analysis, they answered questions on a worksheet.


I love this station shown below! Mr. Harker gathered "artifacts" from his fellow 6th grade teachers. Students had to use their knowledge of the teachers to determine which tub contained their items. They obviously know their teachers well because this station was by far the least challenging! 


I hope this snapshot gives you some ideas about how to use QR codes in your classroom. It was great to see how QR codes can enhance well planned activity, linking students to content only accessible through the technology. Looking forward to seeing more examples from Smithton teachers! 

Monday, August 29, 2016

Accessing and Signing into OverDrive

Looking for access to a wealth of electronic texts for your students? Then let's take a look at OverDrive.

Access and download the OverDrive app from Self Service.

Once it's downloaded, choose "Continue" at the bottom of the screen because we are using OverDrive through our school.

Next, choose "Add a library".

Now search for "Columbia Public Schools" in the search field.


Choose the "Columbia Public Schools" option, not your own school! 

Now sign in with your Columbia Public Schools computer username and password. Just your username, not your entire email address. 

You are in! Now you can browse and checkout electronic books and audio books. Find the one you want, tap on the cover, then tap "borrow"

Once it's checked out, press "Go to Checkouts".

Now you'll see a list of checked out materials. You'll see in this instance, I have 14 days to finish the books. Choose the option for "Read (in your browser)".

This link will send you to Safari. Sign in with your school username and password.

Voila! Now you are ready to read. Swipe to the left to turn the pages. Enjoy!


Thursday, March 10, 2016

1:1 Teacher Talk: Whitney Adams

Whitney Adams
Lee Expressive Arts Elementary
5th Grade

"What's the biggest benefit of having a 1:1 classroom?"


1:1 Teacher Talk: Kara Johnson

Kara Johnson
Lee Expressive Arts Elementary
5th Grade

"Has your opinion changed about having iPads in your classroom?"


1:1 Teacher Talk: Stacy Robison

Stacy Robison
Two Mile Prairie Elementary
5th Grade

"What's it like having iPads in 5th grade?"


1:1 Teacher Talk: Beth Newton

Beth Newton
Oakland Middle School
8th Grade Science

"What does 1:1 do for your students?"


1:1 Teacher Talk: Sherry Schaefer

Sherry Schaefer
Oakland Middle School
7th Grade English and Math

"How has 1:1 impacted your teaching?"


Monday, November 30, 2015

My stupid keyboard is in the middle of my screen!

I'm seeing this more and more. Frustrated students and teachers with keyboards seemingly floating in the middle of the screen, blocking the majority of the space you are trying to use. There's an easy fix. Here's what you do:


The keyboard above shows a keyboard that is "undocked". Definitely something that is easy to do accidentally. To dock the keyboard again, press and hold on the keyboard icon in the bottom right. Then choose "Dock". Your keyboard will then return to it's rightful spot at the bottom of the screen. Magic.


Thursday, September 17, 2015

iOS9 News App

So I've been a terrible blogger lately. Or should I say for about six months now. But I'm striving to change that right now. I'm am going to dedicate time every week for a post. So I figured I'd start small with an updated feature from iOS9: the News App. 

I'm sure this has apps like Flipboard worried. The News App appears automatically on all devices that update to iOS9. When you open the app the first time, it allows you to choose from a wide variety of publications including CNN, USA Today, Sports Illustrated, Wall Street Journal, etc. Make your initial choices and start reading.

I guess mine is a little sports heavy right now. 


Once you're in the app, there are always ways to add more content. The News App breaks down content into channels, topics, or just browse on our own. Click to add. Pretty simple.
Quickly save your stories for later!


Another cool feature is the ability to save stories. When you are ready a story, simply tap the bookmark icon in the upper right corner to save your story for later. Of course, you can easily share stories via iMessage, email, or any of your favorite social media outlets. 

There are some obvious educational benefits from using News. First, all your stuff is in one place. There's no need to have students search for content on the web or download additional apps. As a classroom teacher, I would have my students subscribe to specific sources that fit what's happening in the classroom. 

For student safety, there is an option in the parental restrictions area to turn off access to the News App. 

I think this is a great addition to the iOS9 platform. I don't think I'll give up on other news apps yet, but I think they're time may be limited for me. Check it out for yourself. 

Wednesday, April 8, 2015

Ryan Pingrey's iPad


Here's a look at Ryan Pingrey's favorite iPad apps. Ryan was a math teacher in a previous life and now supports Battle High School as an instructional technology specialist.

Favorite Apps (in no particular order):

  • Google Drive/Docs/Sheets - About three years ago when I was a math teacher at Hickman, I started the school year by trying to only use Google Docs instead of Office products such as Word.  After a couple weeks of learning the ropes, I was sold, and I feel my entire life is now Google Drive.  Except food, there’s no food on Google Drive, and this upsets me.  This was before I had an iPad, and the integration to the mobile device is amazing.  I love that I can fire up any doc or spreadsheet I started on my laptop, continue editing in on my iPad while on the go, and then finish it up later on my laptop with no flash drives or e-mails to myself.  Allowing people I’ve shared the doc with to edit it is also a game changer - just like the food addition would be.  

  • Chrome - Let’s just get this out there; Chrome is the best browser.  Not Safari (sorry Carolyn), not Firefox, not Netscape Navigator, and definitely not Internet Explorer.  Chrome saves my bookmarks and history from device to device and integrates the most fluidly with the Google Apps.  Carolyn likes to point out the Safari has that “share” button, but that’s all she’s got.  Let it go...

  • Google Hangouts - It may seem like it, but I don’t work for Google.  But I would for a free meal.  I’d do about anything for a free meal, though.  I basically don’t use a phone anymore.  I just use my iPad and the Google Hangouts app for messaging and talk.  You can get your own free phone number with Google Voice and anyone can contact you via the Hangouts app.  You can even call for food; I’ve done it.

  • Nearpod - Remember Senteos?  You won’t after using Nearpod.  Imagine a lame powerpoint made not-lame by adding in interactive slides that asked students questions so you and your students could check for their understanding during class.  It’s free but there’s some pay features that you and your school might be interested in purchasing.  I used the free version for a whole school year, but the paid version has some nice stuff.  As a math teacher, I could even have students show their work by writing on their ipads with a stylus and sending it to me.  I could then share any particular student’s work with the whole class by sending it to their screens.  Great for quizzes embedded inside a presentation.

  • Geddit - The not-so-great thing about Nearpod is that once you make the presentation, it’s done.  You can’t edit it during class.  I don’t know about you, but I often changed directions in class while I was teaching and I had a question I wanted to ask the class that I didn’t pre-make on the Nearpod presentation.  Enter Geddit.  You can add questions on the fly.  Pretty cool, but it doesn’t have all the fancy presentation tools of Nearpod.  Geddit’s basically just for asking questions, not the presentation part.  Cool thing - students can go back and look at their results of the class questions in Geddit and use it as a study guide.  

  • Desmos - Best graphing calculator app out there.  Yea, I was a high school math teacher and I love this stuff.  I like to sit down with a nice snack, the Desmos app, and just play around with equations and graphs.  I’m a nerd and I’m hungry.  

  • Weather Channel - My wife has told me that I often know more about the weather than is socially acceptable for someone who is not a weatherman.  This apps helps with my addiction, or it promotes it, I’m not sure.  

  • Tablo - I don’t have cable or satellite TV at home.  I use an over-the-air antenna for local channels.  My antenna hooks up to something called a Tablo box at home that wirelessly beams all my local channels to basically any wifi-enabled device in my home: Smart TV’s, Roku boxes, smart phones, and my handy iPad.  From the Tablo iPad app I can see a live TV guide, set-up and manage recordings, and airplay the live TV to an Apple TV or Chromecast (I think).  Pretty fun.  

Friday, February 6, 2015

Home Streamer app

Here's a simple app that does a powerful thing. It's called Home Streamer and you guessed it, it lets you stream your devices's camera. Here's how it works.

First, download the app from the app store. It was free when I got it, but that doesn't guarantee it is now. But don't worry if it costs money now! If you are a teacher with Columbia Public Schools, we have copies of the app to give you for free. 

Once it's downloaded, the process to start streaming is very simple. Launch the app. You should be asked to allow the app to use your iPad's camera and microphone. You should agree. Now you'll see something like this picture, except you probably shouldn't see my tape dispenser. 


At the top of your screen, you'll see an IP address. Simply open up your favorite browser and enter that IP address in the URL bar. Voila! There's your video being streamed to your computer. And not only that. We tried it out across different buildings and it worked. There is a slight lag with the video and audio, but it was only about a second delay. 

There are only a few options to mess around with, which in my estimation, is a good thing.


One feature that is handy is that you can add a password in order to connect from the browser. When you enter the IP address on your computer, you'll get a screen to enter the password. I've connected a few times now, and both times I was given a different IP address to use. But using the password will help you determine when you want people to view. Simply change the password to revoke access. You can also turn off the audio.

How would you use an app like this? Well, lots of ways. We've had lots of requests for helping connect remote students to classrooms. You could easily use it on an iPad stand to use as a document camera. It's only a one way viewing, so you wouldn't use it for a video conference unless you just wanted to sit and get. 

Give it a shot and let me know what you think. Happy streaming! 


Wednesday, January 7, 2015

Managing Electronic Distractions

If you or your students have no problem managing distractions when using their iPads, then you are excused from reading any farther. And you're probably not being very honest. Here's some information along with a great video on strategies for self-managing distractions on your iOS device. Ryan Pingrey (@RyanPingrey) put this together for the students and teachers of Battle High School.

It's a great video that you could use with your class. If you skip to the 7:20 mark, you'll see some great tips for how to use the "Do Not Disturb" feature to keep you focused. 


Some of the tips from students were awesome:
  • Leave the device in your bag when not using it
  • Don't install any non-school apps
  • Turn off notifications
My favorite was from the student who was put on restriction. He said that his grades got so much better while he was restricted, that he chose to keep those restrictions on even after he earned the privilege back. Now that's self-awareness!

Friday, December 19, 2014

Elementary Media Specialist: Kristen Burkemper


Apps I love:
Productivity: I use these apps on a daily basis.  I love that I can access my files on both my ipad and my computer.  
  • Google Drive
  • Notability
  • Evernote
  • Google Classroom

Classroom: These are all my go-to apps when I am working with classrooms on different projects.  Most of these apps are so versatile that you can use them across many grades and subjects.
  • iMovie
  • Front Row (math)
  • Popplet
  • Show Me
  • 30 Hands
  • Audio Boom - audio recordings
  • Heads Up - fun game for indoor recess, brain break, or vocabulary

Reading: I am always reading so I love my reading apps
  • Overdrive
  • Goodreads (check out Bookopolis for a kid verson of this - it is web based, not an app)
  • Flipster
  • Destiny Quest

I have been exploring a lot of coding activities recently so right now I really like both Kodable and Tynker. Hopscotch is also a great coding app, but I have not used it much yet.

Thursday, December 11, 2014

iBrainstorm vs Sticky

iBrainstorm
I wrote a little while ago about an app called Sticky. Since then I've seen it used in quite a few 1:1 iPad classrooms with success. There were some limitations to the app, most obvious of which is the limitation of creating two projects in the free version. Well, iBrainstorm is an app that has some features that Sticky doesn't. And the other way around. Here's a comparison of the two apps. 

Project Winner: iBrainstorm
Sticky only allows you to create two projects before you have to pay. You can delete and start over, but that's a pain. iBrainstorm allows you to create at least six (that's where I stopped). Much more versatile if you are using it extensively.

Multimedia Winner: Sticky
Sticky
I couldn't find a way to insert pictures in iBrainstorm. Of course, I could be missing something, but if it's not that obvious then it should be. Sticky allows you to quickly take or insert pictures from Photos. Sticky also allows for embedded web resources on your page. Very handy for research.

Project Flexibility: Sticky
Even though you can only make two projects in the free version, Sticky allows you to make multiple pages within your project (one student was on page 534 before her teacher stopped her). With iBrainstorm, you only get one page per project. Very limiting.

Aesthetic Winner: Sticky
iBrainstorm looks boring. Just a plain brown background. Yuck. Sticky lets you change the background of your pages. Great for organization by color. 

Writing Winner: iBrainstorm
You can add your own writing to iBrainstorm projects but not in Sticky. It's a nice feature if you'd like to interact with your sticky notes to draw comparisons, link ideas, or add your own comment.

Overall Winner: It Depends

I think both apps have nice features that the other should have as well. I'm quite surprised that the apps haven't applied those missing features to improve their apps. I would encourage your students to have them both on their iPads to use for different tasks. After all, they are both free. 

Monday, December 8, 2014

Shelli Thelen's Top 4 Apps


Shelli’s Top 4 for Fine Motor
  • Play 123:  Free. Use a stylus or your finger to trace shapes, make shapes, “balancing” shapes while making a stack, draw lines, etc.. One feature I like is that you don’t have to be able to read and it expects you to “stay on the line” in order to move forward. It is also fun to “spin” an object!
  • Pinch Peeps: Free. Really requires you to use the pincer grasp. And if you don’t bring your fingers together, you don’t get the points.  Play the timed version, it is fun!  Turn off the advertisements for this game.
  • ABC Tracer: Free Version. This app helps with letter and number formation.  Most letters are made the “cps” way. While it has an image and a word to anchor the letter, it does require you to go in ABC order. You must get A right before going to B. Can choose capital, lowercase, numbers or words.
  • Lego Instruct: Free. This app is like a step by step still image tutorial of how to make simple Lego things. Great resource during Center Time in the Lego Center.

Friday, December 5, 2014

Teaching good notifications manners

Everyone loves to feel wanted. That's one reason we want our phones and tablets to let us know when someone is connecting with us. It's only human nature. But at the same time, most teachers don't want their students' devices to pull them away from the learning activities in the classroom. It's only teacher nature. So what can we do? How about teaching students a simple way they can have all their notifications set up the way they want, but also a simple way to mute them during class? 

iPads and iPhones (and I would wager Android devices as well) have a simple feature called "Do Not Disturb". Since we have so many iPads here in CPS, I'll stick to that device. It's easy to set up and easier to turn on. Here's how you use it. 

Step 1: In your Settings app, you'll see the option for "Do Not Disturb". Tap on it. 


Step 2: There are several options to choose from within the Do Not Disturb screen. The one that's most important is the bottom option for "Silence". You want it set to "always" so the notifications will be silenced when students are on their home screens or within an app. Otherwise, it's only good for the lock screen. 
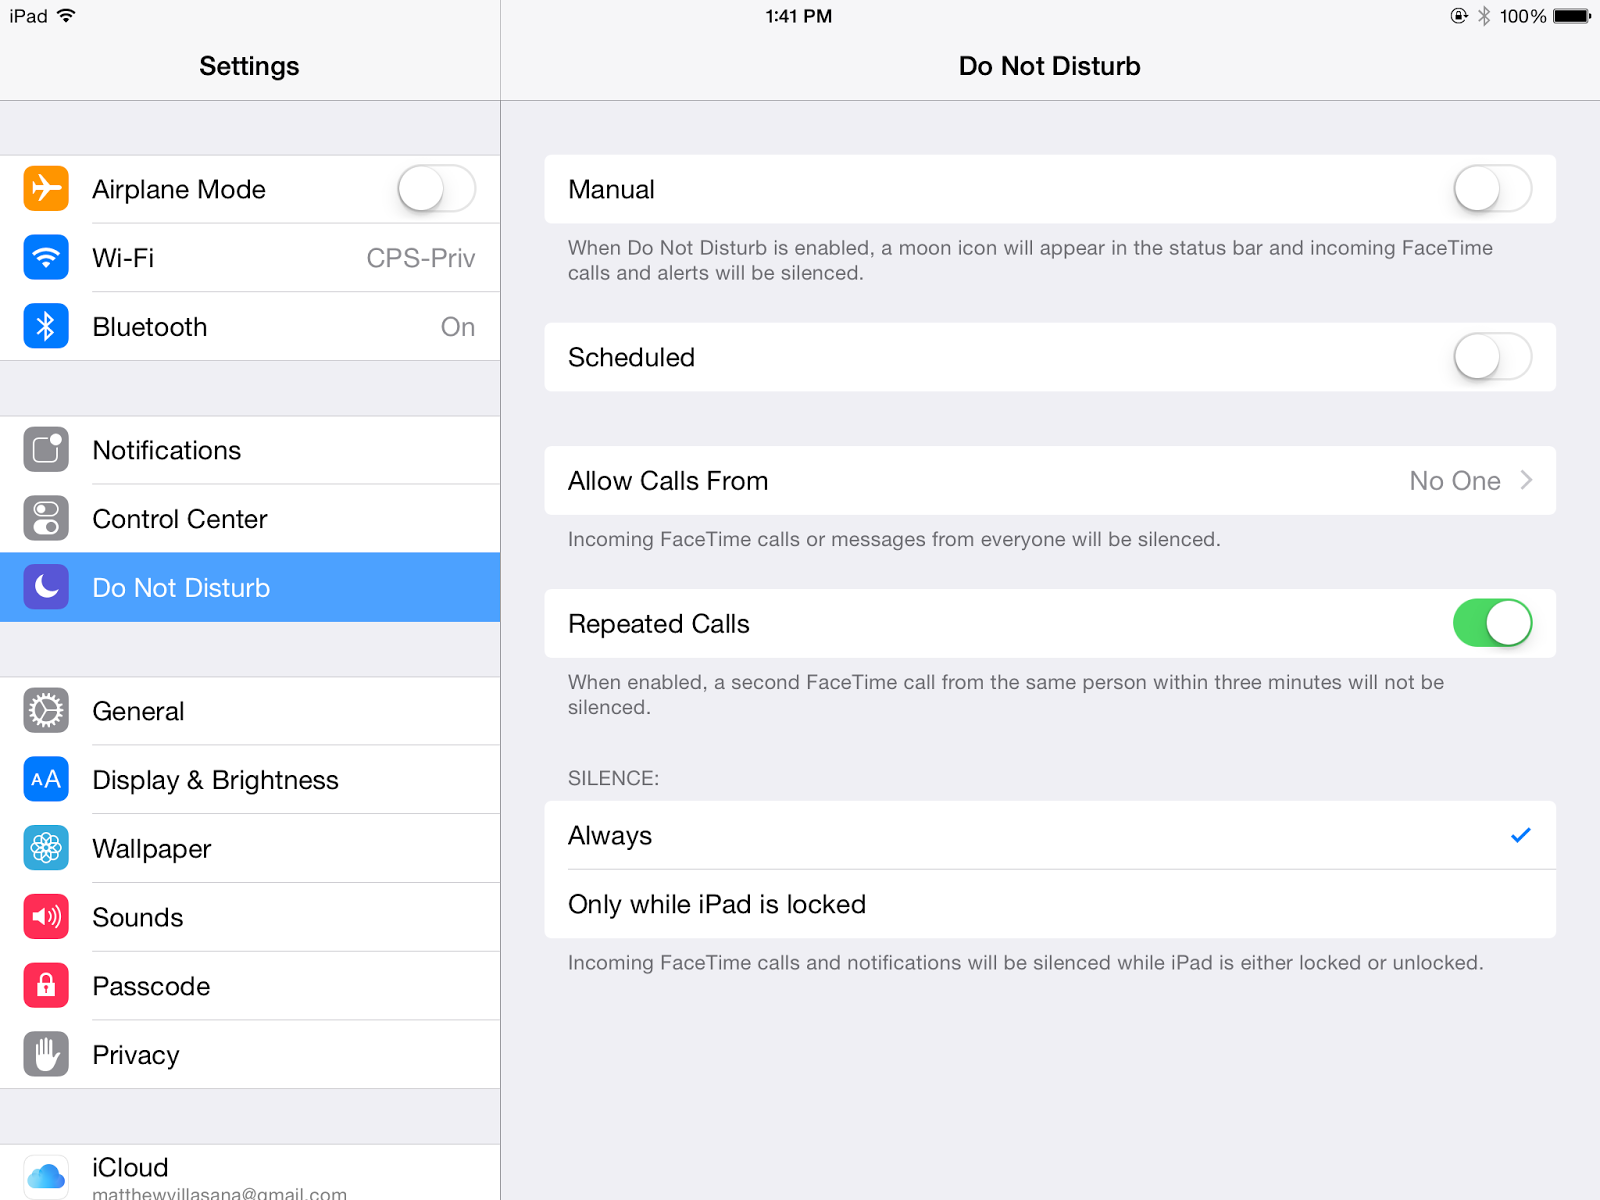
"Do Not Disturb" menu
You can also set up a scheduled "Do Not Disturb". For example, you could have students set it up during the school hours so it turns on automatically for them. 

Step 3: Make sure notifications are set for the apps you want. Usually when you open an app for the first time, you'll get asked if you want to turn on push notifications. However, if you're like me, you'll likely gloss over it to get started with the app. This is where you can make adjustments to receive the type of notification you want from the apps you want. 
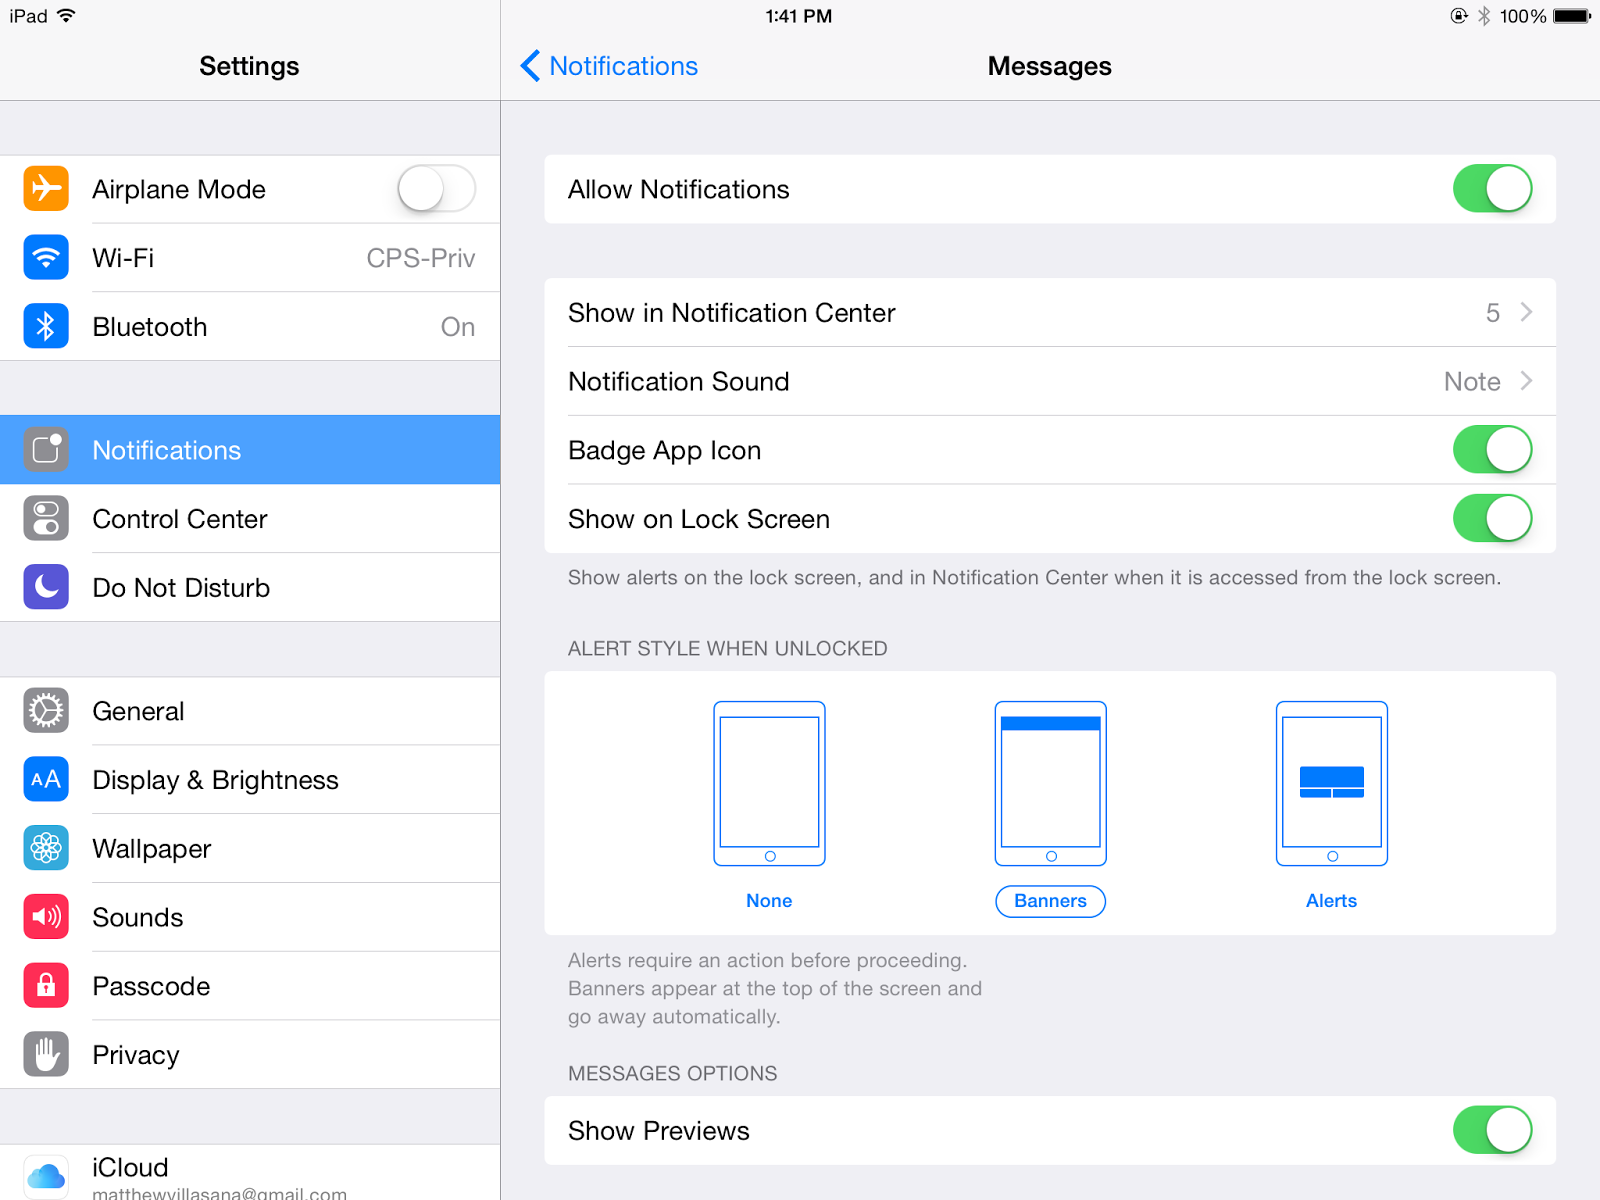
Set up your notifications
Just visit your "Notifications" area in "Settings". Go through your list of apps and set the options you want. You can choose to include badges (the little numbers in the red circles), show notifications on the lock screen, and select what type of notification you want (none, banner, or alert). You can also choose if you want a preview of the message which can be handy with email, messages, or perhaps news events. Of course, previews could be detrimental if you are displaying your iPad when you receive a private message...
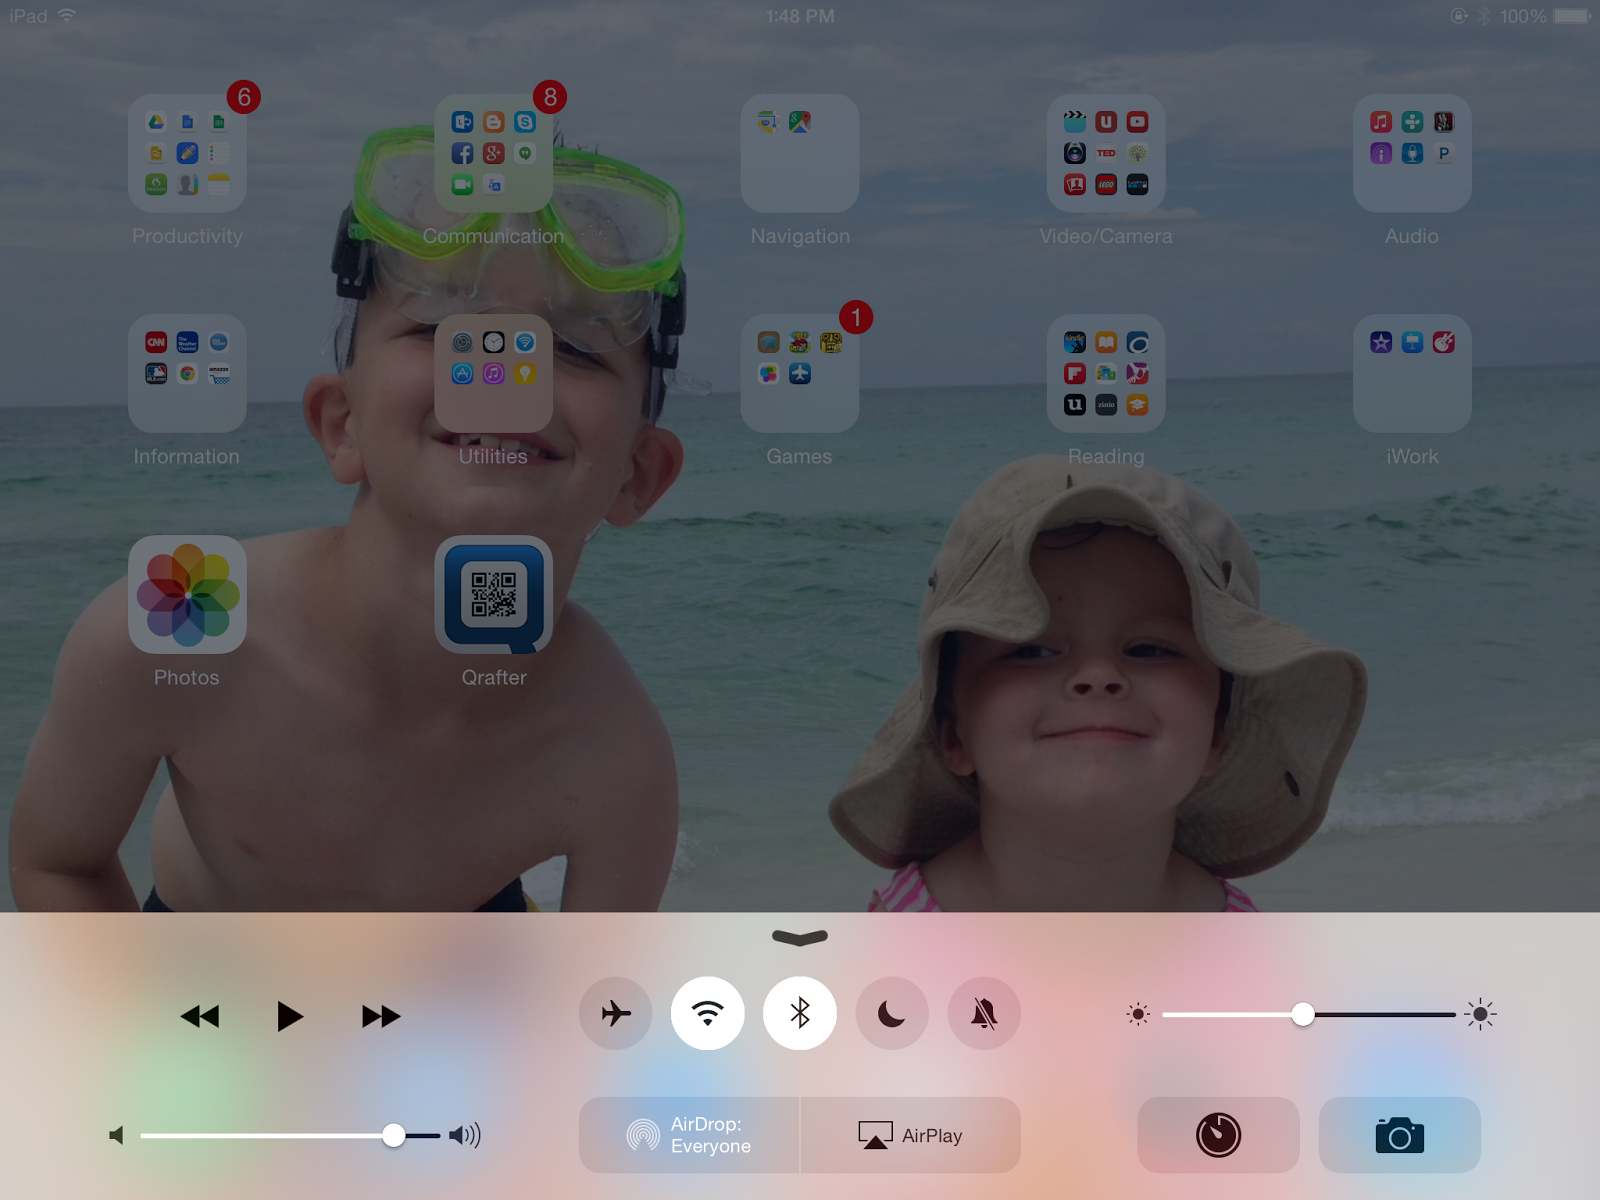

Reveal the control center
Step 4: The last step is to turn on "Do Not Disturb". From your home screen, swipe up from the bottom to reveal your control center. You'll see a button with a crescent moon that indicates your "Do Not Disturb" status. When on, the button is white. When off, it's grey. You'll also see the small crescent moon in the upper right corner of your iPad's screen when it's turned on.
That's about it. I think teaching skills such as these are an important part of your digital citizenship curriculum. Instead of telling students that they can't be notified, give them some tools to manage their notifications to create a win-win situation. 


Thursday, December 4, 2014

Sending Garageband songs to iMovie

One of the coolest iMovie features is the ability to easily import songs from iTunes to add flavor to your video. However, I have the hardest time figuring out the iTunes file structures, syncing content, etc. So when I was asked to see how to move a song from Garageband to iTunes, I wasn't excited about the task. But after doing a little playing around, I found a much simpler method. Try it out.

Step 1: Create your original song in Garageband. Then from your main projects screen in Garageband, choose "Select" in the upper right corner and then choose your song.


Step 2: Tap the "Share" button in the upper left corner. Whatever you do, don't send it to iTunes. Instead, choose "Open In..."


Step 3: Now you'll get options for sharing your song. Adjust the artist, composer, and album name to your liking. You can also change the quality settings. Then choose "Share".


Step 4: Choose to send the song to "iMovie"


Step 5: The iPad will launch iMovie. From here, you'll get to choose where you want to send your original song. Choose from an existing project or create a new one.


Step 6: The song will now be added to your project. From here, you can adjust the volume, choose to loop it or shorten it to fit the movie.

Now that Garageband is free, I would definitely have students create their own background music to fit your project. It promotes far greater creativity and also eliminates those pesky copyright issues that come up when you publish your video to YouTube. 

I know you have a ton of little composers in your room who will love to create their own music. Can't wait to see what they come up with!