Here's a simple but productive app. It's called TimesUp. It's a pretty simple timer. So why would I make a big deal out of it?
The teachers in our district all have access to Airserver to mirror their iPads. One hiccup with Airserver is that not every app works perfectly while being mirrored. Some apps will show video but no audio. For timer apps, it's important to be able to hear the timer.
TimesUp offers two important features. First, it gives a visual display of how much time is left. It's not obtrusive or distracting. Just a simple green bar that moves down the screen. Second, you can hear the timer go off while you are mirroring the display.
Simple enough.
The official iPad site of Columbia Public Schools in Columbia, Missouri. There is a lot going on with iPads in CoMo. All CPS teachers have an iPad to use with their teaching. Student 1:1 iPad deployments include all of Battle High School, Oakland Middle, and West Middle. All 5th and 6th Grade students across the district are 1:1 as well. Please join us on our journey!
Thursday, April 11, 2013
Friday, April 5, 2013
Using iMovie for student book trailers
There is no limit to the ways that iMovie can be used for classroom use. That's the beauty of the app: the only barrier is imagination. With that being said, I've been fortunate enough to work with iMovie in many schools across many different grade levels, from kindergarten to 9th grade. One of the most widespread uses of iMovie has been for creating book trailers. It's been widely popular and very easy to accomplish. Here are some tips and resources to support your project.
Plan, plan, plan!
I'm not a huge proponent of exclamation points, but I think it's applicable here. Planning is the most important piece of creating book trailers. There is a ton of work that needs to be done before iMovie comes into play. And if you work with kids, you know the value of having a plan. One of the best features of iMovie is the ease of inserting videos and still images. Therefore, the hardest part in my eyes is finding the right content to add. This is where that planning comes into play. So...our gift to you:
Here are two storyboard examples for you to use:
Storyboard for the "Teen" iMovie trailer - created by me
Storyboard for the "Romance" iMovie trailer - created by the awesome duo of Anna (@annaoz429) and Jill (@jillkiley03)
Show students how to save images to the camera roll
Don't assume anything. Teach the students what to do. This concept isn't tough for any age. However, the smaller the fingers, the harder it is to press the screen without moving the image. I've helped six year-olds with this, and it can be a bit of pain.
Find an easy way to publish
iMovie offers several ways to publish and share your work. So choose a method that's going to be easy for you, but still offers an audience for your students. Here are some suggestions:
- YouTube - some folks have an aversion to YouTube. I get it. But it's so easy to export your finished trailers to your class YouTube channel. Easy and awesome for open sharing.
- Vimeo - a better option if you want to put your videos behind a password-protected wall. Upload trailers to your account and distribute the password to just your students and parents.
- Camera Roll - a bit pedestrian, but it works. Save to the camera roll, plug in to your computer, and move it over. Then do whatever you want with them from there.
So there's three tips and some resources for you. It's a great app to use, and the students absolutely love it. And it's one of those apps that once the students use it once, they start seeing other projects to complete using iMovie. Have fun, and be sure to share your trailers.
Friday, March 15, 2013
App Review: Haiku Deck
Now here's an app you're going to want. Haiku Deck is an awesome, free tool for creating slideshows on your iPad. It's not as powerful as Keynote, but the price is better and it's easier to export. The piece I like the most is how easy it is to embed pictures on your slides. If you are working with visual literacy, this is a great app to use.
When it comes to creating presentations with students, it's all about efficiency. Haiku Deck offers just that. There are a lot of great features mixed into an easy-to-use interface. To start, you can choose between five different free themes. Slides can formatted as a title screen with 14 different layouts. Slides can also have lists with bullets or numbers.
Adding backgrounds is where this app gets really simple to use. For each slide, you can add your own images as backgrounds or use the embedded browser. What's really cool is that the browser automatically searches the text on your slides. Or if you want something different, you can create a custom search. backgrounds can also be a solid color. You can also add charts and graphs.
When you're finished, there are a ton of exporting options. You can play your slideshow from the app. Or you can share it through Facebook, Twitter, Email, Post to blog, export as PowerPoint or Keynote, or get the URL to send to viewers. There are three privacy options: public, restricted to viewers with a link, or private just to you. Finished slideshows are saved in the app for you to access later.
Easy enough. Haiku Deck offers everything you could want in a creation app: easy to use, easy on the eyes, easy to share. And free, of course.
| Themes and title slides |
Adding backgrounds is where this app gets really simple to use. For each slide, you can add your own images as backgrounds or use the embedded browser. What's really cool is that the browser automatically searches the text on your slides. Or if you want something different, you can create a custom search. backgrounds can also be a solid color. You can also add charts and graphs.
| Searching for an image with the embedded browser |
Easy enough. Haiku Deck offers everything you could want in a creation app: easy to use, easy on the eyes, easy to share. And free, of course.
Friday, March 8, 2013
Two similar apps, two distinct differences
I got the pleasure of hanging out in Donny Silver's Spanish 2 class yesterday at Rock Bridge High School. Donny has been using an iPad this year to support his teaching. From early on this summer, he's been researching new applications and sharing them with his school and us. He's a great resource.
When I set up the visit, Donny told me that I'd be able to see how he uses remote desktop apps to deliver content. He uses two apps. Here's a snapshot of how it worked.

Splashtop2
Donny used this app extensively to multitask throughout the period. Splashtop2 is a remote desktop app and as of now, it's still free. He circulated the room to check on homework and take attendance. He also ran his SMART Notebook files from the iPad. That gives him the freedom to teach anywhere from the room. Donny said the drawback for Splashtop2 is that it's difficult to write neatly and select small icons on your screen.
That takes us to...
Doceri
This piece was pretty cool and unexpected. I've heard of teachers using Doceri as a remote desktop. I was curious about why he would use two different apps that I thought were the same. But here is the draw for Doceri: it lets you zoom in to a spot on the iPad screen without changing the size of the display that students are viewing through your projector. For this activity, Donny had a table with verbs that the students were conjugating. He could zoom in on an individual table, write the word neatly because there is plenty of space, and it appears on the screen for students to see. Really cool.
However, Doceri is an app that I haven't recommended because of the price. The app is free, but the software you need to run on the computer is $30 for a license. When I asked him about it, Donny said he didn't pay anything for it. Not sure why. So try it out and maybe you'll have the same success.
So, there's a couple of options for you. If you are just starting out, then definitely start with the free Splashtop2. But you might find value in the ability to zoom in to access small icons on your screen or easily write in small places.
When I set up the visit, Donny told me that I'd be able to see how he uses remote desktop apps to deliver content. He uses two apps. Here's a snapshot of how it worked.
Splashtop2
Donny used this app extensively to multitask throughout the period. Splashtop2 is a remote desktop app and as of now, it's still free. He circulated the room to check on homework and take attendance. He also ran his SMART Notebook files from the iPad. That gives him the freedom to teach anywhere from the room. Donny said the drawback for Splashtop2 is that it's difficult to write neatly and select small icons on your screen.
That takes us to...
Doceri
However, Doceri is an app that I haven't recommended because of the price. The app is free, but the software you need to run on the computer is $30 for a license. When I asked him about it, Donny said he didn't pay anything for it. Not sure why. So try it out and maybe you'll have the same success.
So, there's a couple of options for you. If you are just starting out, then definitely start with the free Splashtop2. But you might find value in the ability to zoom in to access small icons on your screen or easily write in small places.
Airserver Part III - Mirroring Problems
If you are user of Airserver, and there are a lot of you, then you might notice that sometimes things don't work the way they are supposed to. For instance, you spend time putting together your activity, have all the sites and multimedia ready to go, and when you try to display your video, there isn't any sound.
Here's a tip I received that might help alleviate some of those issues.
One teacher found that if he mirrored the iPad from the home screen, then moved into the app, sometimes there were issues like the "where's my sound?" dilemma. But some apps offer mirroring inside the app. When he mirrored multimedia from inside those apps, it worked perfectly.
YouTube is a great example. Next time you are showing a YouTube video, open the app first. You'll notice a mirroring icon underneath the video. Press that icon and set up the mirroring from here. Works great.
Now, I'm not sure how many apps have that option embedded. But if something isn't working correctly, check and see if there is an option to mirror from within the app.
Here's a tip I received that might help alleviate some of those issues.
One teacher found that if he mirrored the iPad from the home screen, then moved into the app, sometimes there were issues like the "where's my sound?" dilemma. But some apps offer mirroring inside the app. When he mirrored multimedia from inside those apps, it worked perfectly.
YouTube is a great example. Next time you are showing a YouTube video, open the app first. You'll notice a mirroring icon underneath the video. Press that icon and set up the mirroring from here. Works great.
Now, I'm not sure how many apps have that option embedded. But if something isn't working correctly, check and see if there is an option to mirror from within the app.
Wednesday, March 6, 2013
A Powerful Combo: Notability and Google Drive
I've wanted to see how Ryan Pingrey conducts his math class for most of the year. Last summer, Ryan attended several of our Google sessions to see how to utilize Google docs in his math classes. You could tell the wheels were spinning when he saw the great collaborative features that Google offers as well as the convenience of online access. He also saw great potential in his new iPad. Yesterday, I was able to see how it all came together.
I knew that Ryan had a lot of his math content on Google Drive. And I also knew that he liked the Notability app for its Google integration as well the ability to annotate documents. But it was so impressive to see it in action. Here's a snapshot of how he puts it all together:
- The math curriculum is available as a PDF. Ryan starts out by accessing the PDFs and pulling the content he wants to use. He then moves it into his Google account. This piece is important because it enables him to pick and choose what content he wants for each lesson.
- Next comes Notability ($1.99 in the App Store). This versatile app lets you access your Google content from inside the app. Ryan pulls up that lesson on his iPad through Notability.
- Ryan uses Airserver to mirror his iPad through his data projector. It's a great little program and pretty inexpensive. Read this post if you want more info on Airserver. Basically, he can now teach from anywhere in the room. Great for classroom management.
- Now the students can see the lesson materials on the SMARTboard. The second feature of Notability that Ryan loves is the ability to annotate. He can quickly write equations, draw graphs, or anything else directly on the document. Notability allows you to pinch and zoom (which was great because I was sitting in the back of the room; my eyes aren't what they used to be).
- At this point, Ryan has a documented record of what he's taught on the file. But that's not it. When he's done, Ryan can send that document right back into his Google account as a PDF. Because he has multiple sections of the same class, Ryan can open the same lesson from his Google account for the next class and save a copy from that class as well. A great way to keep record of what you've done with each group of students.
- Of course, because all of this process is on the iPad, Ryan can quickly move from Notability to any other app or web browser in order to access other information on the fly.
Seems like a lot, right? But think of the possibilities. Ryan told me that he prepares a few lessons at a time. Like anything, it's important not to try to rework an entire year's worth of material at a time. By the end of this year, he has next year canned and ready to go. And making chances is easy. Just open up that lesson and modify it to meet the needs of that particular class.
As you can see, powerful teaching can take place with the combination of a few free and inexpensive apps. I'm always impressed with the methods that teachers come up with to deliver instruction. Ryan is an awesome example of that process. Thank you, Ryan, for sharing your knowledge with us!
Friday, March 1, 2013
App Review: Penultimate
Another great release from Evernote, although it's not a new release. There are lots of folks out there who really, really want to write notes by hand on their iPad. I am not one of those people, so it's not something that I've been stressing about. There are a lot of good apps that let you write on the screen. Skitch (by Evernote) would be a good example. But Penultimate is a good option, and a free one, I might add.
First off, it's a good looking app. Which definitely counts. You'll want to create an Evernote account if you haven't already done so. Once you have Penultimate downloaded to your iPad, you'll be able to sign in to your Evernote account to link the apps. First, you have the ability to create multiple notebooks. When you open a notebook, the app automatically orients to portrait mode. Now you are ready to create.
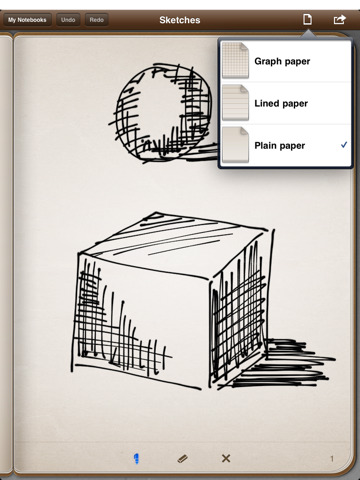
Let's look at the features. There is the ability to change the background paper. You can choose from graph paper, lined, plain, or shop for other options. From there, you'll see a lot of the same functionality as you get with Skitch. You can insert an image from your camera roll or take one with the embedded camera feature. Easily resize the image by dragging the corners and move it anywhere on the page with a swipe of your finger. You can also rotate it with a twist. However, it only sticks in 90 degree increments - kind of a pain. And here's the funkier part (is funkier a word?). Once you drop the image, it's stuck there. You can't easily pick it up and move it to another location. Go figure.

The writing function is straightforward. You can choose from ten different colors and vary the thickness of the line. Then write. The eraser erases. The scissors needs work. As I'm playing around here, sometimes it cuts and sometimes it crashes. When I was on it earlier this week, I was able to cut out parts of the page and move it around. Not so much right now. I should put in a work order to Evernote to check that out.
When you have your notes completed, there are many options to choose from. Because it's an Evernote product, it syncs and sends your notebooks to your Evernote app. Then you can manage the Penultimate notebooks just like you would an Evernote notebook. You can also save pages to the camera roll, email, or open in another app.
That's about it. If you are a heavy writer, then this might not be the app for you. I hear from my handwriting-crazy colleagues that there are better ones like GoodNotes. But if you want something simple that you can use to take simple notes or annotate images, then give Penultimate a try. At the very least, it won't cost you much.
Let's look at the features. There is the ability to change the background paper. You can choose from graph paper, lined, plain, or shop for other options. From there, you'll see a lot of the same functionality as you get with Skitch. You can insert an image from your camera roll or take one with the embedded camera feature. Easily resize the image by dragging the corners and move it anywhere on the page with a swipe of your finger. You can also rotate it with a twist. However, it only sticks in 90 degree increments - kind of a pain. And here's the funkier part (is funkier a word?). Once you drop the image, it's stuck there. You can't easily pick it up and move it to another location. Go figure.
The writing function is straightforward. You can choose from ten different colors and vary the thickness of the line. Then write. The eraser erases. The scissors needs work. As I'm playing around here, sometimes it cuts and sometimes it crashes. When I was on it earlier this week, I was able to cut out parts of the page and move it around. Not so much right now. I should put in a work order to Evernote to check that out.
When you have your notes completed, there are many options to choose from. Because it's an Evernote product, it syncs and sends your notebooks to your Evernote app. Then you can manage the Penultimate notebooks just like you would an Evernote notebook. You can also save pages to the camera roll, email, or open in another app.
That's about it. If you are a heavy writer, then this might not be the app for you. I hear from my handwriting-crazy colleagues that there are better ones like GoodNotes. But if you want something simple that you can use to take simple notes or annotate images, then give Penultimate a try. At the very least, it won't cost you much.
Subscribe to:
Posts (Atom)