Friday, March 21, 2014

Use Talkboard for realtime whiteboard collaboration

Whiteboard apps are a dime a dozen. For instance, I started to review one called Stage, but was unimpressed because it did nothing new and had a lot of in-app purchases to get basic features. At this point, many teachers are familiar with basic whiteboards like Doodlebuddy and more advanced ones like Educreations and ShowMe. However, Talkboard is an app that few people are, well, talking about. But I think it's one that you should check out. 


Create multiple boards. Swipe back and forth to access them
At a basic level, Talkboard is just a whiteboard. There really aren't a ton of features: you can draw in different colors and with a few different styles. You can erase. You can clear the screen. And that's about it. You can't insert any pictures or shapes. There is no recording feature. So with that being said, you are wondering why I'm wasting my time writing about it.

Well, the answer is with the collaboration piece. Talkboard lets you share your board with other users. Then more than one user can collaborate on a board at the same time. Sharing is easy. Simply press the "+" on your board and choose between sending invitations by AirDrop, Messages, or Mail. If the user doesn't have the app, they will be sent to the App Store to download it. If Talkboard is already installed, the board will simply open in the app. You create a profile with just a name. You don't have to enter an email, so it's easier for younger students to use.

Once the board is shared, it's open for all the users. Write your own ideas, draw pictures, whatever. Any user can add or erase, so keep that in mind. I only tried sharing it with two people, but I imagine it would support more. But I think it would get pretty distracting if you had more than two or three students (or teachers) on there at the same time.

So there you go. Another free, simple tool that I feel has real practical applications in the classroom. Give it a try and be sure to let everyone know how it works for you. 

Thursday, March 6, 2014

You gotta get Geddit

So I came across Geddit through Twitter the other day and I'm glad I did. Everyone is looking for reliable apps that gathers student feedback during class. It's easy to see the benefit of anonymous comprehension check-ins. Geddit will do that for you. Easily. And free. 

Visit Geddit to get started. The first thing you'll do is create a teacher account. Enter your school email and set up a password (one you won't forget, or write it down). Now you can begin to create your classes. Students will need to have their own Geddit accounts. If you work with students over 13, they can create their own accounts. If you work with younger students, or just want to manage your student accounts to avoid headaches, you can create student accounts for them. Elementary teachers can simply hand enter student usernames. Or if you have a large number of students, you can upload a class list. Students who create their own accounts can easily join your class with an enrollment code that Geddit generates for you. 


Once you have your students enrolled, start creating your lessons. Each lesson can include "topics" and "questions". Topics are general areas that you'll move through during the lesson. It's a nice idea to use topics because students will be able to check-in during the topics to assess their understanding. So a student can be identified as having trouble in one topic, but be fully up to speed with another. As you move through the topics in each lesson, the topic name is displayed on the students' devices. Teachers can also create specific questions ahead of time to ask during the lesson. Just pop them on the student devices at the appropriate time. Or if your lesson is going in an unforeseen direction, you can add questions on the fly. 

Lesson view with topic and prepared questions


Student check-in with free comments


Here's what students see on their devices. They'll be able to see the topic that you are currently discussing. At any time, they can check in with their level of understanding. A nice feature of Geddit is that students can check in multiple times. So at the beginning of the topic, the student may not get it. But once you do some more work, he or she could check-in again to say they are all caught up. And they can add comments or questions with each check in. Again, all anonymous. 

As you are teaching, you'll see an updated, color-coded view of the class check-ins. That gives you the ability to decide in the moment whether you need to spend more time on a topic or move on to something else. At the end of the lesson, teachers can see a detailed report of the check-ins and answers to the questions. It even shows you a list of students who you might want to touch base with. I tested it by changing my check-in from "unsure" to "I get it". Even though I changed my comfort level, I was still marked as someone to follow up with. Nice feature. 

Lesson summary with responses and "challenged students"


Lessons can be copied and run again in the same class or moved to other classes. Another cool feature is that you can email your lessons to colleagues. It will automatically remove all student information and data when it's sent. Pretty slick.
Sharing your lesson with another teacher

Now, that description is just enough to get you going. There's a lot more the app can do. But at the simplest level, it's a super easy way to guide your way through lessons more efficiently. Who doesn't like instantaneous feedback? 

Finally, Geddit support is great. There are a number of video tutorials and printable posters to use in your room for getting students started. Team Geddit is quick to respond to requests as is Justin Mann, the app's developer. That's always a plus. Give Geddit a shot and let me know how it works for you. 


Wednesday, March 5, 2014

Audioboo


Teachers are always looking for easy ways for students to share their learning. Audioboo is a great option for creating and publishing audio projects like podcasts. It's a free app that can be used on your iProduct or Android device. 

First, let's talk accounts. In order to publish your work, you'll need to create an account. So if you are working with students under 13, you'll most likely create a class account where you can publish all your work. Creating the account only took a few minutes and it's well worth the ability to publish and share your students' work. Because that's what it's all about: sharing. 

The app itself is very easy to use. Creating "boos" will be simple even for the youngest students. Simply press the red record button, the 3 second countdown starts, and then you are recording. The app also allows you to pause the recording and create the project in segments. If you have tried recording something and don't possess the gift of gab, you'll love this feature. Students can easily chunk their broadcast into smaller, more manageable segments. 

All your recordings can be saved as drafts. However, you can't name the drafts right away. I figured I could just tap on the file in order to change the name. Wrong. I found that I had to press "publish" in order to get an option to add a name to a recording. A minor inconvenience, or maybe I couldn't figure it out (entirely possible). Saving the drafts is great because you can always open them up again and add more content. 

When you are ready to publish, you can name the project, add a description, tags, photos, or category. Then visit Audioboo.fm and sign into your account. You'll have access to all your published boos. And the best part, you'll have the ability to share them in a number of different ways. You can set up your Audioboo account to automatically tweet your boos, publish to Facebook, Tumblr, or Wordpress when they are published. Or you can grab a link or embed code to copy and paste in your class website or blog. It will also create a QR code that you can print out and post. If you are really looking to create a platform for audio posts, you can set up your boos to publish to iTunes or via RSS. 


Audioboo is incredibly simple. Very easy to create and share. Try it out and be sure share your projects for others to enjoy. 

Tuesday, February 25, 2014

Stick Around app

Check out the app "Stick Around" from Tony Vincent and MorrisCooke. Tony's been collaborating with app developers for years, so my first thought was that this app would be beneficial for student learning, easy for teachers to learn, and create a product that's easy to share. As it turns out, I was right. It fits all those categories. If you are a fan of SMART Notebook but want a better price and functionality, then you should give Stick Around a try. 

There's a ton of features to Stick Around. To keep it simple, Stick Around lets students and teachers create projects that are similar to a SMART Notebook file. When you create a new project, you have the option to choose a blank screen or a variety of templates: Venn Diagrams, columns, timelines, sequencing, or vocabulary cards. If you choose to start with a blank project, you have complete flexibility in the background to add just a color, picture, or an image designed in another app. Stick Around also offers complete flexibility to crop, rotate, and resize your background images. And you can add multiple images or draw your own from inside the app.

Lots of templates to get your started.
Once you have designed or chosen your background, you can then add stickers to the project. The stickers serve as the main content interaction piece. Once you have chosen "Stickers" from the menu bar, you'll see a tool pane appear on the right side. Just drag and drop the appropriate sticker on the workspace. Each sticker can include text, image, hyperlink, or even a voice recording. Think of the possibilities with those options. You could include a science vocabulary word complete with a link to content websites. Or students could record pronunciations for their world languages classes.

Another powerful feature of Stick Around is the ability to turn your projects into interactive puzzles. Choose "Answer Key" from the menu bar. If you've chosen a template, the areas will automatically be highlighted as answer areas. Just move your stickers in the area to assign them to that area. If you started with a blank canvas, you can draw your own answer areas to assign the stickers. When completed, touch the export button in the upper right to save your puzzle. If you've made a mistake, you'll get a friendly reminder to help you get it straightened out. 

Easily add images to your background.
Now your puzzle is saved to your iPad. But how do you share it? Easy. There are a number of sharing options you can use: email, DropBox, Google Drive, Explain Everything, or WebDav. Simply select the projects or puzzles and link them up to your account. Then other users of Stick Around can import them and start working. A great tip that Tony offers is to share your "projects" with teachers so they can modify them before sending to students. Then share your completed "puzzles" with students to complete. 

And wait. There's more. If you've shared your projects or puzzles with DropBox or Google Drive, you can distribute them via a link. Include it in your website or create a QR code to send users to your work. Very slick. They will need the Stick Around app in order to use your projects or puzzles. 

Solar System Puzzle. I got Venus wrong.
As you can see, it's a great app. We've all enjoyed apps but still had the "I wish it had this feature" moment. I think Tony's instructional background has helped to eliminate those moments. Several times I thought I found something that I wanted the app to do. Then I found out I could. And to make things very easy for teachers, there's a "help" overlay in the app and extensive tutorials that are accessible from inside the app. 

Currently, Stick Around is $2.99 in the App Store. It's also available in the Volume Purchasing Portal for half price when you buy more than 20 licenses at a time. For those of you who are willing to give up a Starbucks coffee, I think it's worth the investment. For more information, visit the Stick Around website or Stick Around Blog.


Tuesday, February 18, 2014

Publish with Dragon Dictation

I had the pleasure to meet M last week when I was in her room to help publish feature articles. I sat with her to work on getting her writing formatted. But what I found was really exciting. M is a fantastic researcher and writer. The information she found to answer her student generated questions was focused and spot on. Seriously, impressive for a third grade student. 

But she really struggled with spelling. She could read her own work, and spelling didn't slow her down with her writing. But as a reader, following her thinking was challenging for me. We spent a half hour correcting her work. But what happens when there isn't an adult around to work one on one? I couldn't leave M without a tool. So I mentioned Dragon Dictation to her teacher and begged to come back to show M how to use it to publish her work. Here's what we learned. 

First, we started with her written work. As you can see, it's very organized and ready to go. With M, we learned it was a good idea to read a paragraph at a time to practice fluency. Then we were ready to start the dictation. 


Dragon Dictation is a remarkably simple app which makes it perfect for kids. And adults. The screen shows a list of your previous dictations on the left. Then your workspace is on the right. Tap the screen to start the recording. It's important to speak slowly and loudly. With M, we needed to go back and re-record at times because she was rushing or trailed off at the end. Another great feature of the app is that you can edit directly in the app. When we finished recording a section, M went back and matched up her work from Dragon to the paper and made adjustments when it wasn't correct. Like anything, it's a learning process. Dragon does not insert punctuation, so the student has to go back and add them in. Here is what we ended up with:


As you can see, it's not perfect. But for twenty minutes on an app she opened for the first time, it's pretty good. Dragon lets you export your work in a variety of ways. The route we chose was through simple copy and paste. You can email it, add to your blog, or move to a google doc. 

I learned several things from my first visit with M. First, she was ecstatic to try it out. Second, it takes practice. You can't expect for it to work perfectly the first time. Students will need time to practice their fluency and volume to maximize the effectiveness of the process. Finally, like a lot of kids, M has access to a device at home that she'll likely use tonight to download Dragon Dictation and start using it. I see a lot of possibilities here. 

Blogged from my iPad!


Friday, January 24, 2014

Digital texts through OverDrive

Hey CPS teachers! There's another new resource available to you and your students. Remember the post I wrote last year about OverDrive? Probably not. But if so, that same resource is now available for Columbia Public Schools teachers and students. Here's what you should know. 

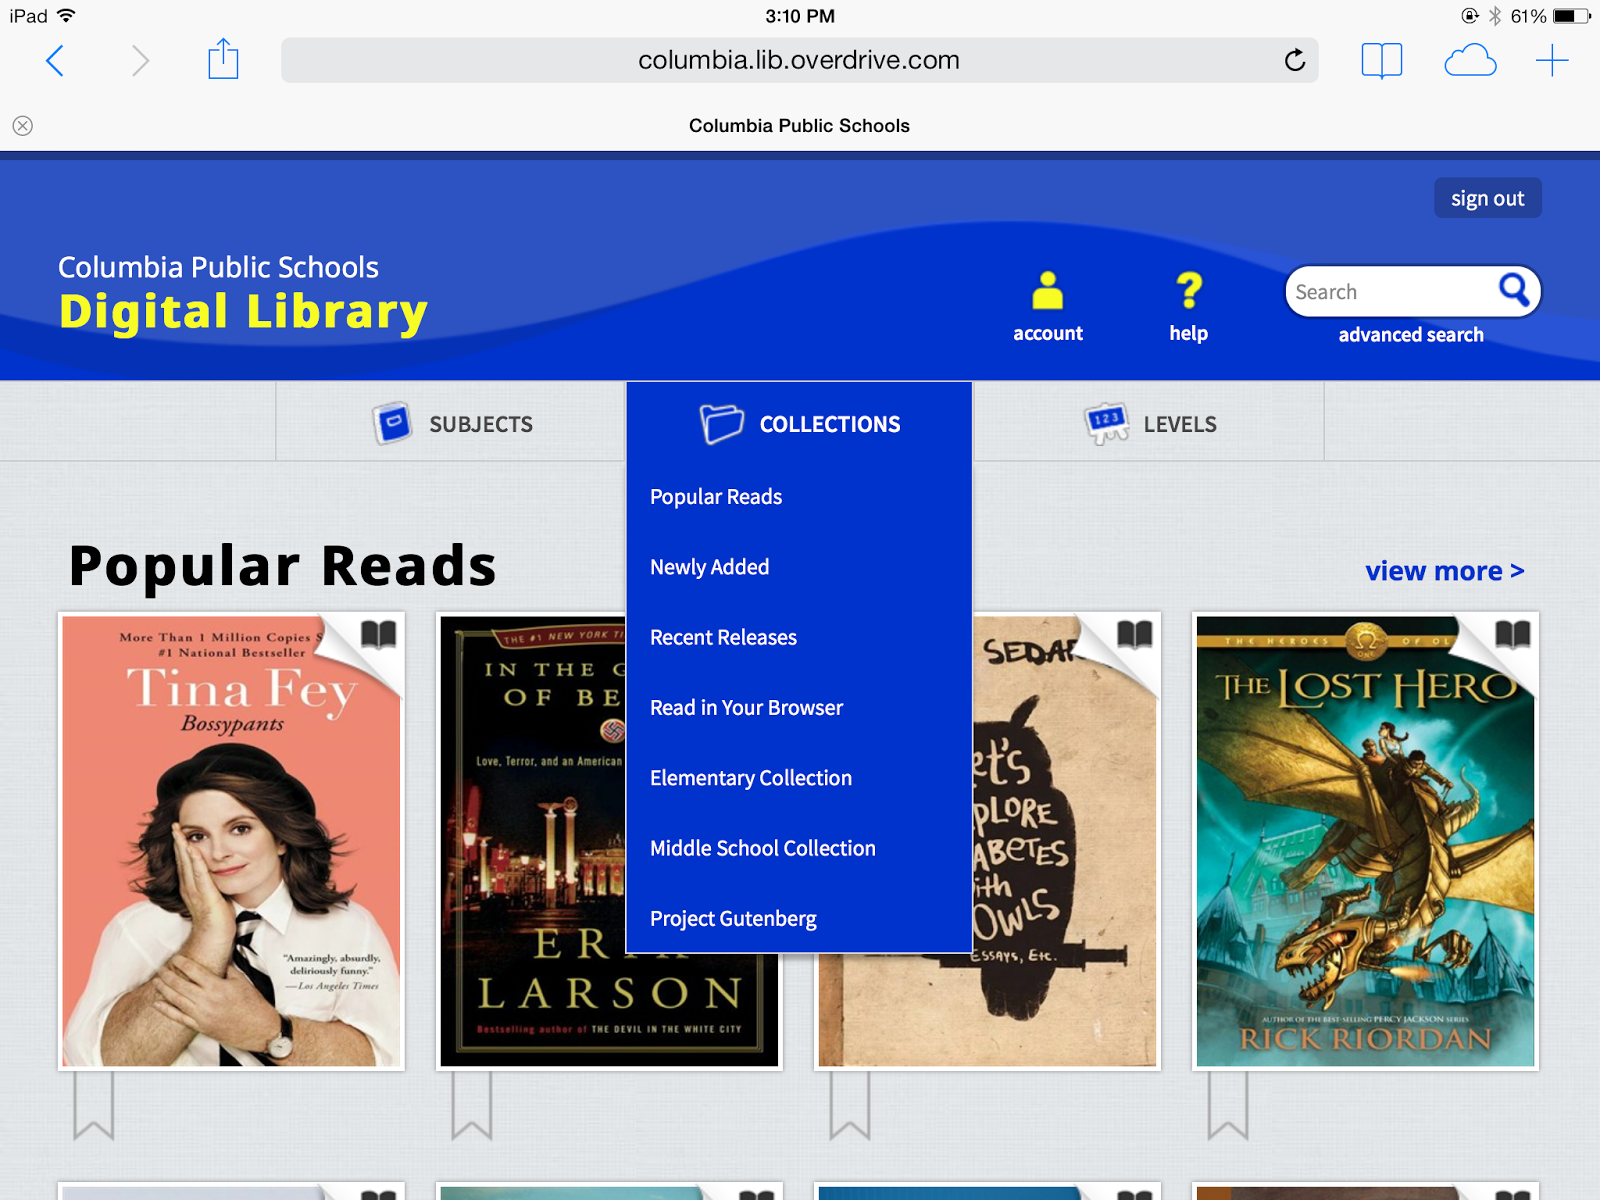
Digital texts have been purchased to get the process started. The collection currently has about 550 titles of audio and eBooks, but expect it to grow as more of our libraries allocate money to digital texts. This process is much like the process through the public library but easier. Students log in to the account through the Columbia Public Schools Digital Library. Check with your media specialist to learn the student username and password, you know, for security reasons. Once inside, there are lots of ways to search for appropriate materials.

On your dashboard, you'll see options for subjects, collections, and levels. "Subjects" are sorted into categories such as biography, mystery, science fiction, and literature. "Collections" offer breakdowns by elementary and middle school. And "levels" offers you searchability by ATOS (not sure what that is), Lexile Measure, or Reading Level. Most of the selections at this time are geared towards middle and high school students. But there are some great elementary reads from authors such as Rick Riordan and Carl Hiaasen.

When you find a title you'd like to read, you have a few options for checkout. You can download the book as a Kindle eBook or as an ePUB. For either option, you need to have either an Adobe or Kindle account to read the book in those apps. If you don't have one of those accounts, or if this is for a child, you can also read the book in your browser. It can be read online, or you can download the book so it can be read offline. Pretty slick. 

If you have any other questions, ask your friendly local media specialist. And most of the checkouts are for 14 days, so get reading. 

Thursday, January 16, 2014

Use GroupMaker for, well, making groups

Came across this nice little app through the Twitterverse. It's called GroupMaker, and it's a free way to organize your class roster and set up groups. There are a lot of features that makes this app easy to use and handy for the classroom. Let's take a look.
Main Roster Page (note cute dough figures)

First off, the app is free. Which is good. Once you have it downloaded, you'll want to set up your first class. You have the ability to make multiple classes and name them whatever you'd like. Class members are added manually, which could be a turnoff for you secondary teachers out there. But it only takes a few seconds to enter a student, and you don't have to enter anything more than a first name if you don't want to. That will save you some time. You can also assign pictures to each student. Or you can leave them as adorable little dough figures if you'd like. Another option you have at your disposal is the ability to classify each student by gender, race, or some other category of your choosing. 

When you have your students inserted, they make up your first roster. You'll see all their smiling faces (or the little dough figures) looking at you on your home screen. From there, you can use the app's Attendance Mode to mark kids absent. No, it won't interface with eSchool or any other SIS. But it takes that in consideration if you are making groups. There's also an option for a random picker to choose a student/group at random. Kind of like the random picker in SMART Notebook.


GroupMaker lets you create multiple groups. You name the group and then have several settings you can choose from to set up the groups. If you assigned information about student gender or ethnicity, you can account for that when making groups. There's also an option for sorting randomly. Here's where I think the app can improve. When I created my groups, all it did was break up the roster by number. The students were still in order alphabetically. It would make sense if there was a truly random generator to break up the roster into groups. I didn't see that in the app. Once you choose to account for gender, for instance, the students move around. You can easily drag and drop students into the groups you want. But I'd still like to start with a truly random grouping. Once in groups, you can also use the random picker to choose a group.

The app has some other features. There's a timer embedded in the app. That's for timing. There's also a sound meter, which serves no purpose as far as I can see. 

I think GroupMaker would be a handy app, especially in the elementary classrooms.