The official iPad site of Columbia Public Schools in Columbia, Missouri. There is a lot going on with iPads in CoMo. All CPS teachers have an iPad to use with their teaching. Student 1:1 iPad deployments include all of Battle High School, Oakland Middle, and West Middle. All 5th and 6th Grade students across the district are 1:1 as well. Please join us on our journey!
With all the iPads out in the hands of fifth graders, we are getting all sorts of requests for ideas to complete traditional activities in more efficient and eco-friendly way. If you are a fan of teaching student classifying and organizing skills, but are tired of seeing post-it notes on your students' supply lists, then you should check out the Sticky app.
Add notes, pictures, or website resources
The beauty of this app is in its simplicity. Students can create new worksheets to house different projects. Inside the worksheet, simply double tap the screen to add content. There are four options to add:
Basic text
Pictures from Photos
Take a picture
Links to websites
Once you add the object to the screen, you are free to move it around. That's the funny part: they really aren't sticky! Which allows teachers and students to move objects to sort by different classifications. Once you have them in the right place, simply take a screenshot to save your work to the Photos app.
Teachers should always look for a way to allow students to publish for authentic audiences. Kids just work differently when their product is going to be publicly displayed. In this digital age, there are so many tools to choose from and publishing can be easily accomplished from many different devices. So what's stopping you?? In many of our 5th grade 1:1 iPad classrooms, teachers have allowed their students to create blogs to share their learning. It's really easy to get them started. Here's a guide for how you can get your students started using Blogger. Set up your blogs Self-explanatory, I know. Students log in to their Google Apps accounts and access Blogger. Check out the video below for some direction on how to get started. Tips:
When students sign in initially, have them "create a limited Blogger profile" with just their first name. No need for Google+.
Determine a naming convention for the students such as "Matt's 5th Grade Blog". That will save a lot of time. The names can be changed later if necessary.
Remember that you can pick whatever title you want, but the address has to be unique. Remove any spaces and punctuation and you might have to mess around a bit with the address to make it available.
Don't mess with the templates at this time. Patience.
Adjust the settings for commentary
Blogs are great for the social interaction, but we want to make sure our students are protected. Blogger has many settings to allow safe, moderated commentary.
Tips:
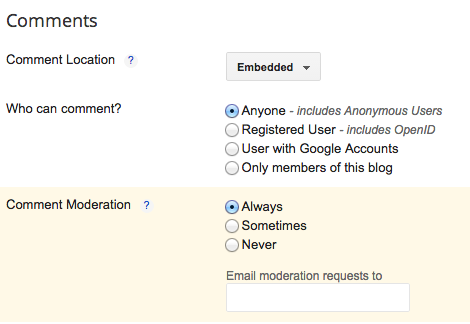
Always have comment moderation set to "Always". This means that nothing will appear published on the blog unless the author wants it on there.
Consider having "who can comment" set to anyone. This setting would allow anyone who finds the blog the opportunity to comment. Often times relatives of students love adding comments, but may not have a Google account to use.
Start with what's comfortable for the teachers, students, and parents.
Adjust the widths of the blog
Because most of our publication will come from the iPad, it's important that the blog be formatted properly. We've found that if you don't adjust the widths, pictures that are published from the iPad will overrun the posting area when in landscape mode.
Tips:
Have the students go into the template area to customize it. Go to the "adjust widths" option and make the sidebar the minimum width.
Play around with the widths and flip back and forth to the preview to make sure it's going to work.
Publish a picture that is horizontally oriented from the iPad as a test. Then go back to make adjustments if necessary.
Give them a chance to customize the blog
It's what everyone wants to do, so let the students show their personalities by customizing the background, colors, etc.
Tips:
Have the students put away the mouse and just watch as you walk them through some options. Be sure they understand they'll have time to work in a moment.
I think it's best to only use the "simple" and "picture window" templates. Those are the easiest to figure out.
Show them these areas: templates, backgrounds, and advanced. I like to show how to adjust the entire color scheme as well as individual pieces like the blog title and header backgrounds.
This is a great time to discuss best practices. Making sure the title is large and legible. Use contrasting colors so pieces are clearly visible. Don't go crazy and make it distracting.
Once you have the student blogs created, make sure you find an easy way to share them. It's a good idea to create a separate spot on your classroom website or blog to add links to the student blogs. The students can find and create a shortcut to their blog on their school iPad and then AirDrop them to their peers to bookmark as well. And of course, utilize your classroom Twitter account to tweet new blog posts. A great hashtag to use to promote discussion is #comments4kids.
Have fun! Looking forward to seeing your students's posts.
So after living with the Apple ID for Students program for a few months (and not just a small amount of suffering), Apple is finally starting to get the message that schools need more control over their accounts. They've just given districts the ability to change passwords for students. I'm guessing they realized they don't have the manpower to give schools the timely support needed, and it was time to hand over some control. Here's what you can do to get started with changing passwords.
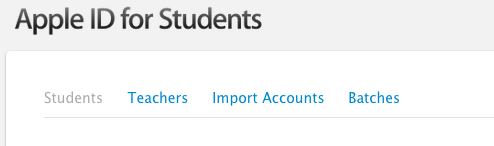
Choose "Teachers"
The first step is to log in to your school account at deploy.apple.com. When you get in, choose the option for "Apple ID for Students". If you haven't been there since last week, you'll now see an option for "Teachers" listed amongst the options for uploading and managing student account. Click on "Teachers". Next you'll have to add teachers to your site. Simply click "Add Teacher" on the right side and enter your Apple ID. You'll then be added to the list. Feel free to add any teachers or administrators you would like to have access to change accounts.
Now, visit https://edu-appleid.apple.com/teacher and log in with your Apple ID. You'll need to have the student's Apple ID and birthdate. Enter that info and press "Continue". The next screen allows the student to enter the password that he/she wants. Once it's entered, a screen tells you that an email has been sent to notify you about the changes. However, when I tested the process, no such email was received by the student or the parent. Sigh... A note for administrators. When playing around with this process, I found that your Apple ID can only be used at one location. So if you have multiple locations set up in your school district, you'll need to have the media specialists or whoever manages that building enter their Apple IDs to reset passwords. Let's hope this change is a sign of things to come. Happy password management!
Getting yourself enrolled into Managed Distribution will enable your institution (in our case, Columbia Public Schools) to distribute apps and books to your devices. It's a fairly easy process, assuming Apple doesn't make any changes. We think that iOS8 coming online has caused a new step in the process. This is the latest set of instructions for getting enrolled. First, you need to request an invitation. Talk to your media specialist about getting the school invited. When that occurs, you'll receive an email from "External Company". I know it sounds like spam, but it's not. Open the email on your school device. Do not do it on a computer or anywhere else. Just on your school iPad. Here's what the email looks like:
Click on the link that says "Sign In". You'll be sent to the Safari app. This is where you will sign in to the server. It requires your active directory username and password.
At this point, you'll be moved into the App Store. I first received a popup with terms and conditions. Agree to all that if you want. If you don't, you're stuck. Now you'll sign in with your Apple ID and password. When successful, you'll get a message saying that your organization can now assign apps to you. Sorry, mine was already complete so I couldn't get a screenshot.
Once complete, you should receive the Notability app right away. If your apps are set to auto download, it should appear immediately. If not, it will be in your purchased history for you to add manually. Through this process, you are more than welcome to put assigned apps on up to five personal devices.
Here's a great tip from Leanna Guillory (@mrsguillory3rd). She's been using iPads in her room for about a year, but this is her first year for a full 1:1 environment. Her classroom, like most, hurts for wall space. Her students use chart paper all the time to document learning in the classroom. However, it was always a challenge to figure out which charts to leave up and which to remove. But with devices, it was a problem no more. Leanna decided to use the Photo albums to her advantage. She had students create albums for different subjects, take pictures of the charts, and then organize into those albums. Then the old charts can be removed and replaced with new ones. Simple idea, but pretty smart. Here's a quick video to show you how to create an album and organize your pictures:
As more and more iPads are getting deployed to classrooms, teachers are looking for easy ways to get started with their devices. One thing we've discussed in the past is Today's Meet. Basically, Today's Meet is a website that allows you to add to a comment stream. The fancy term is a "backchannel". I got to be at Parkade today with fifth grade classrooms as they got started on this process. Here are some tips to get you started. Making a Today's Meet board is simple enough. Visit Today's Meet on your favorite browser. You'll be immediately asked to create your board. Now you can sign in and make an account, but that's something I haven't tried yet. You name your board and then assign a duration. If you create an account, you can save your board for up to a year. When you're happy, choose "Open your room". Board naming tip: Make the name as long as you want. That way it's tougher for a random person to come across it. So if you are making it for your class read aloud, call it MrVillasanasfifthgradereadaloudboard. Or something else.
Now that the board is open, students are free to comment. All they need to do is add their name and start posting. Simple, except you are probably wondering how to easily get your kids to the board. Well, here are some ideas: QR codes: since the board is a website, use a QR code generator (goo.gl, QR generator, QR stuff are some examples) and post it for students to access with their QR reader apps (QRafter is my favorite). Once they are there, have them save the board to their iPad home screen for easy access later. Link Shortener: my second choice. Use your goo.gl account to shorten the link. Because you can sign in with your cpsk12.org Google account, your shortened links will be saved for later. Then you can have students type in the address in Safari and then add the link to their home screen. Added bonus: it automatically makes a QR code for you to use as well. A couple of tips to make the experience more enjoyable for you:
Keep the conversation simple. The younger the students, the simpler you need to be. For elementary students, I would have a single question or response for each board so it's easier for them to remember. You should probably have the question posted in the room as well.
They are going to play around. Give them a chance to get their fun out in a different setting, such as a community board where they can chat with their friends.
Create multiple boards for different purposes. It's easy to create and the kids can add all the boards to their devices. They can even make a folder on the iPad just for Today's Meet boards.
Again, Today's Meet is a simple application. You can print an archive of the board, but you can't guarantee that a student is using his or her real name without looking over their shoulders. If you want to get more in-depth with discussion board features, you can use Blackboard. However, if you are looking for simplicity and ease of use, Today's Meet is a great place to start.
Wow, it's been a crazy start to the year. Which is why this is my first post for the new school year. I'll do better... So there are a lot of you out there who have 1:1 student iPads in your classrooms. So this information is pretty important to you. Here's how students can install their email to the iPad: Go to "Settings" and choose "Mail, Contacts, and Calendars". Choose "Add Account". You'll want to choose "Exchange". The student puts in just their username into the email field. Enter their Active Directory password and change the description of their account as needed. Now's the hard part. They should see another screen asking for server information:
Server: outlook.office365.com Domain: leave blank Username: full email address with @stu.cpsk12.org Have your students give it a shot.