Looking for a new and fun way for students to share their ideas? Then look no farther. It's Tellagami, and it's been awarded the prize of "most fun app" from Mill Creek teachers. What's more? It's free. Check out the example below to see how you might use Tellagami with your students. Or just for you. Whatever works.
Thursday, December 19, 2013

Create Collages with PicStitch
 |
| Different layout options |
Once you pick your layout, you can add your pictures. The app pulls from your camera roll and photostreams. You can also add pictures directly from the camera or from a Dropbox account. It doesn't allow you to browse the web for pictures inside the app. That is a favorite feature in Pic Collage and would be a nice addition to Pic Stitch. For now, you'll have to settle for saving images from the web to the camera roll.
 |
| Add pictures from camera roll or photostreams |
When you have your collage perfected, you have several options for exporting your work. Press the "export" button in the lower right corner and you'll see your options. The most popular option, at least for elementary students, is probably to export the work to the camera roll (photo album). You'll also have account options like email, Facebook, Twitter, or Instagram. With Pic Stitch, you'll also see the ability to open the collage directly in another app that's already installed on the iPad or to AirDrop it. Which is always fun.
Overall, I think Pic Stitch is an easy to use, fun app that students will really like. When your students are thinking about publishing their next projects, show them Pic Stitch. Might be just the tool they're looking for.
Thursday, December 5, 2013
Time management with 30/30
 Do you have any students that have difficulty staying on task or managing time? If your answer is no, then you are probably in denial and should seek professional help. If you said yes, then check out the app 30/30. It's a free app that students (and teachers) can use to manage tasks in a user-friendly way.
First, the app lets you create multiple task lists. Each list can consist of several individual tasks, each one assigned a certain time allotment. These lists can be saved for future use. I really like this piece because it allows you to develop a set routine that can be used over and over.
 You have complete control over the individual tasks. Use unique names, icons, and time amounts for each one. Then add them to the list. You can easily add new tasks, delete completed ones, or rearrange the order.
 Once you are ready to start your tasks, simply press the play button. The display changes color to match the color of the task. Then the timer counts down as the dial slowly turns. I like having both features because it gives a great visual reminder for students who aren't able to read or understand the time countdown.
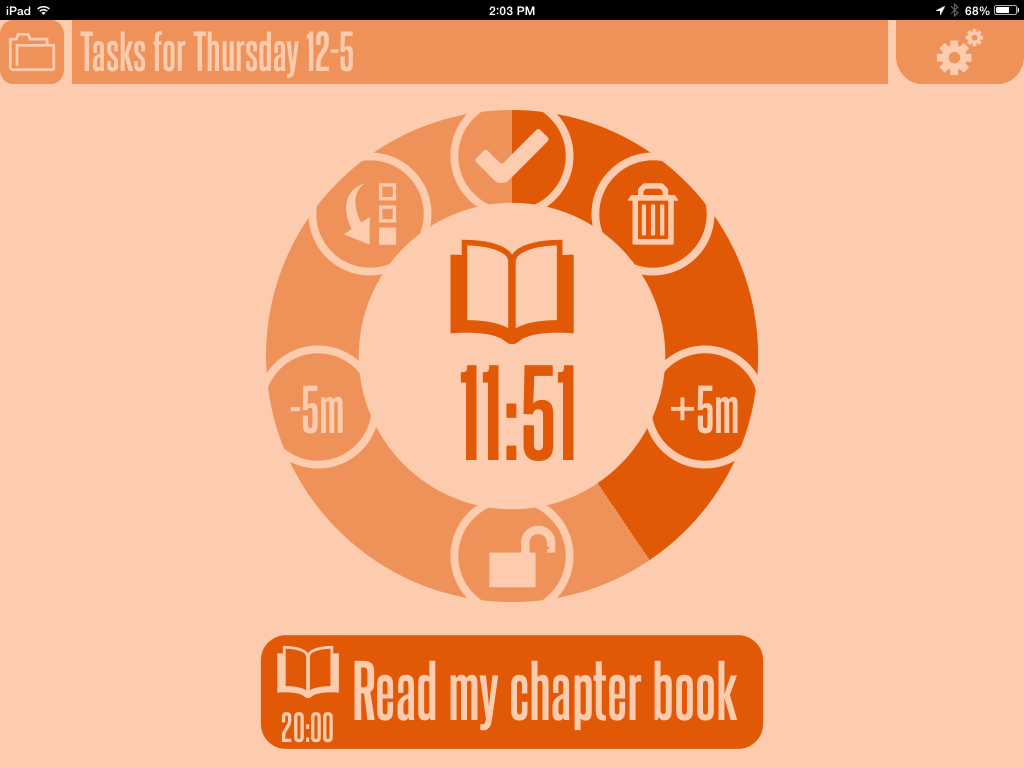
While you are completing the task, you have several options to use. You can quickly add or subtract minutes, move the task to the bottom of the list, or trash it. This is so easy, it could cause a distraction for students. You'll need to consider if the student who is using the timer (or class) should have access to manipulate the app. I can definitely see teachers projecting the app so all the students can see what tasks are ahead and how much time there is to complete them.
All in all, I think it's a productive app that you should try out. Like anything, you'll need to figure out the best use with your students. Or perhaps it's better off as a teacher tool. We all could use a little more help with time management.
Tuesday, November 26, 2013
Ubersense: A must have app
 I was pretty pumped when I saw that iMovie added slow motion to their already great app. However, I wasn't as excited as the few PE coaches I talked to who love the ability to apply slow motion to analyze technique. Well here's an even better option for you. It's called Ubersense. Believe me, the app is far better than the name.
 Essentially, Ubersense lets you take video and analyze it using slow motion, add overlays, side by side comparison, and even comparison with a library of professionals and other uploaded examples. It's great. Here's a closer look at some of its features.
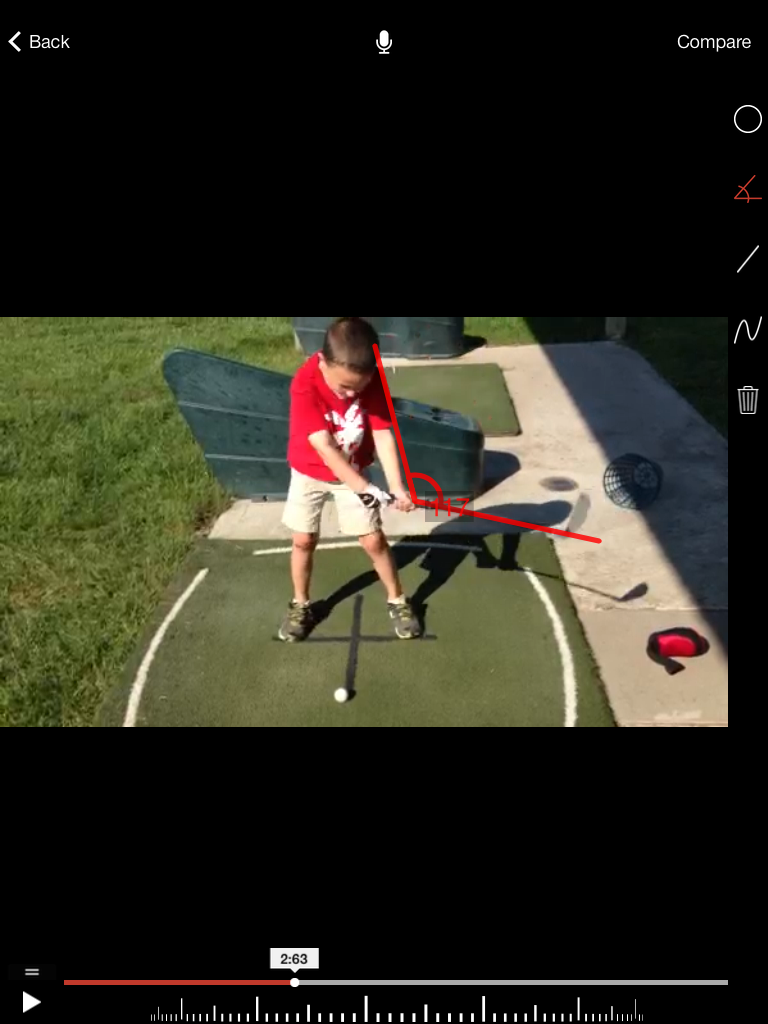 This is what the main video screen looks like. The app enables you to either take a video with the app or import an existing video from your camera roll. Once it's in, there are a lot of great features to play around with. Just above the play triangle, you can lift to reveal different playback speeds. Speeds range from real-time down to 1/8. You can also manually move the frames by swiping left and right on the timeline. It allows for very fine adjustments.
 On the right side, you can see the overlay options. You can add circles, straight or curved lines, or angles. When you use angles, it shows the degrees on the screen. Here's a look at my son's arm angle on his downswing. Not bad for the second time at the range.
Videos can also be narrated. And you can tag your videos by sport or even by the athlete you're working with.
 On to comparison mode. This is when it gets really cool. You can choose to compare two videos, either ones you shot or you can search a library of existing ones. There are lots of videos of professionals and others that have been uploaded by other users. The library is broken down by sport. You'll find weightlifting, golf, gymnastics, hitting, throwing, and even rowing. When you find one that you like, you download it to your device and add it to the project.
 So now I can really get picky with my poor little six-year-old. As you can plainly see from this picture, Reed's arm angle on his takeaway is clearly too great. Look how 2001 PGA Championship winner Keegan Bradley's arm angle is at 128 degrees. We have a lot of work to do if we're going to get Reed on the President's Cup team in 2028.
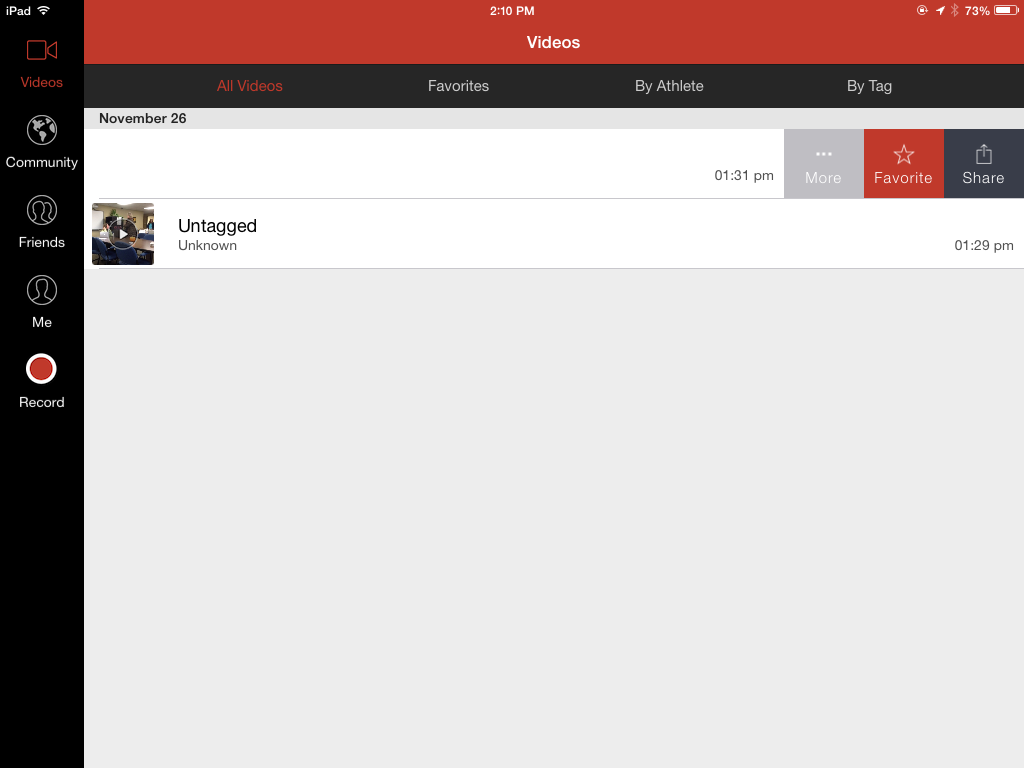
One last thing. Videos can be exported by email, YouTube, Twitter or Facebook. However, it took me ten minutes to find those options. So here's your cheat sheet. On your main video page, you'll see a list of your videos. You need to press on the video you want to export and slide your finger to the left. This will reveal the sharing options. Not sure why it's so hidden. Check it out below.
That's about it for the general overview. Basically, it's a great app. I can see coaches and teachers everywhere getting a lot of use from Ubersense. It just makes sense. Yeah, sorry about that.
CPS staff: Be prepared for wireless to stop working
If you have been reading your emails recently, you may have noticed a few saying that on December 4 you're going to have to change your Active Directory password. Well, that hasn't changed. But what seems like an innocent little password change can actually have quite a few ripple affects on your accounts and wireless connections. We just went through this in our department as a test. Here's a simple checklist for you:
Basic password change:
Basic password change:
- You'll be prompted for a new password when you log in to a district PC on December 4th. Actually, I noticed mine wasn't working the night before, so don't be surprised if you can't access your email at home on December 3rd.
- It might be a good idea to write your new password down in a safe location until you have trained your muscle memory enough to make it stick.
iPad wireless password change:
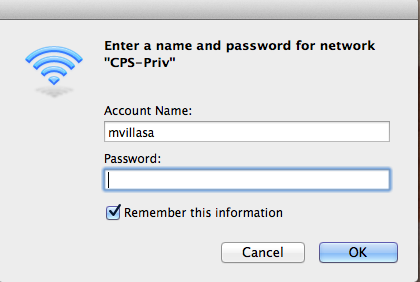
- Now you'll need to use your new password to login to the district wireless network. When I opened up my iPad for the first time, this is what I saw.
- Enter your new Active Directory password. When I did, the iPad still didn't connect. So I had to go back and perform some basic troubleshooting.
- Go to your Settings app and choose Wireless. When I did this, it still wouldn't connect automatically. What I like to try first is to connect to the open CPS-Wireless. Once connected, go back and choose the CPS-Priv. That's when mine hooked up.
- If it still doesn't connect, shut down your iPad completely and restart it. That usually does the job.
- Concerning email on the iPad, I didn't need to change anything. Somehow, it must have updated on its own. Like magic.

Extra points:
- If you are also operating a Macbook on the district wireless, you'll need to reattach to the network with your new password as well. My Macbook Pro prompted me for the change. My Macbook Air didn't. So I had to go to my wireless preferences and reinstall the network.
- Also with Macs, or any other device, you may have to change your password on your Mail or Calendar clients in order to get them connected again.
As always, if you get stuck with anything, ask your friendly media specialist, building technician, partner teacher, or Ken.
Thursday, November 21, 2013
District iPad Managers: Beware!
So...
You need to revise your procedures for getting iPads back from teachers and staff. As a part of your turn-in process that includes removing the passcode, you have to require the user to go back into their settings and do the following:
- Sign out of their Apple ID
- Delete their iCloud account in order to remove "Find my iPad". It will prompt you for an Apple ID password to remove it
Doing this will remove the "Find my iPad" feature (and the rest of their account) from the iPad. Then you can do an "erase all content and settings" restore. When you turn it back on, a new user can take over. Otherwise, you'll see a prompt for an Apple ID and then this page:

Monday, November 18, 2013
App Review: Flashcards [+]
 There are a ton of flashcard apps out there in the App Store. Finding a good one can be tricky and time-consuming. So to help you out in that process, here's a look at one that I think could be pretty useful in your classroom. It has a flashy name, Flashcard [+], and it's a free download. A shout out to Michael Collins at Battle High School for showing it to me.
First off, don't let the woodgrain throw you off. It's quite a contemporary app. Flashcards lets you easily create multiple decks of cards. All of your decks are easily accessible from their main screen. Simply press once on a deck to open it up and start practicing. Or you can press and hold on the deck in order to access additional features or add cards to your deck.

Creating Cards
One of the best features of this app is the ability to create cards with lots of different components. You can choose to create cards with simple text by either typing it or copy/paste. Or you can insert images along with your text. Or you can draw your own images. With all these options, you can see how it can fit with any age or content area. Students can study based on images they've taken with the camera or found online. They could draw their own images for math or science content. Lots of possibilities. What's more, you can choose to include the picture on the back, front, or both sides of the card.
 |
| Enter text alongside your image. |
Once you have your cards created, then it's time to study. Open up your deck and begin. Your cards will show up. Press the card to flip it over to reveal the answer. Then you can mark the card with "I know". Marking it as "I know" tells the app to show it to you less often. There are options for sorting your cards or filtering them so you can focus on a particular set. One setting lets you view the cards in a movie mode that flips the cards automatically at an interval that you set. Change the size of the card for easier viewing.
Create Shared Decks
 |
| Draw your own shapes for math. |
That's about it. Overall, I think Flashcards [+] is a great app that I would use with my students. Although study skills are important, I think students creating their own study materials is even more important. This app gives teachers the ability to do both.
Subscribe to:
Posts (Atom)